Marketo publishing integration
Use the Optimizely Content Marketing Platform (CMP) integration with Marketo to author templated emails in CMP, generate a preview, and send the email to Marketo for final scheduling and publishing.
Optimizely provides a starter kit you can install with CMP's Integration Hub. This includes everything required to connect to your Marketo account and move data from CMP to Marketo.
After the initial connection, your administrator must create a mappings document to map values from your CMP content types to your Marketo emails. You should use the starter kit to do this.
Prerequisites
- Marketo email program – Used as a template for the integration.
- Marketo campaign output folder – Holds the output from CMP.
- CMP app – Included in the starter kit.
- CMP webhooks x2 – Included in the starter kit.
- Middleware mapping configurations – A JSON file that maps data between the platforms.
Configure Marketo
The integration uses a Marketo email program for the template and clones it as a new item within your Marketing Activities before adding your CMP data through Marketo tokens. These tokens are variable fields that may be used throughout your design and are mapped (one-to-one) to content-type fields in CMP. The CMP data replaces the tokens when integrated, giving you your final design. An example token is {{my.M2#PRS#Title}}.
Marketo structure
- Go to Marketo > Marketing Activities.
- Create a folder to store the programs and emails you will create.
- Create a program type of Email. When you select the program, notice the ID at the end of the URL, such as classic/EBP1311A1. In this example, 1311 is the ID. Copy the ID, as you will need it later.
- Create an email within the program.
Email design
The email should have the layout you intend to use and any area populated by CMP data replaced with a token. You only need to create a token in Marketo in the email design. Copy the tokens you create, as you will need these later.
Tokens are unique and are mapped to the content type one-to-one. Although you can repeat a token within the email, it only displays the data from a single field of the CMP Content Type.
Example token: {{my.PRS1#text}}
Repeating Components
If the email author can add repeating components to the email in CMP, you must include the relevant tokens to account for the maximum number allowed. You should use a pattern within your tokens.
For example, Optimizely has a product release component with a title, image, and text. The first tokens should follow a structure for where it is being used: the section, the number of its use, and the field.
Example: PRS1#title, PRS1#image, PRS1#text (Product Release Summary first title, image, and text).
If this should repeat in the design, increase the number each time to make your tokens unique:
PRS2#title, PRS2#image, PRS2#text (Product Release Summary second title, image, and text).
PRS3#title, PRS3#image, PRS3#text (Product Release Summary third title, image, and text).
📘 Note If you only populate two components in CMP, the email sent to Marketo includes white space you need to remove before sending.
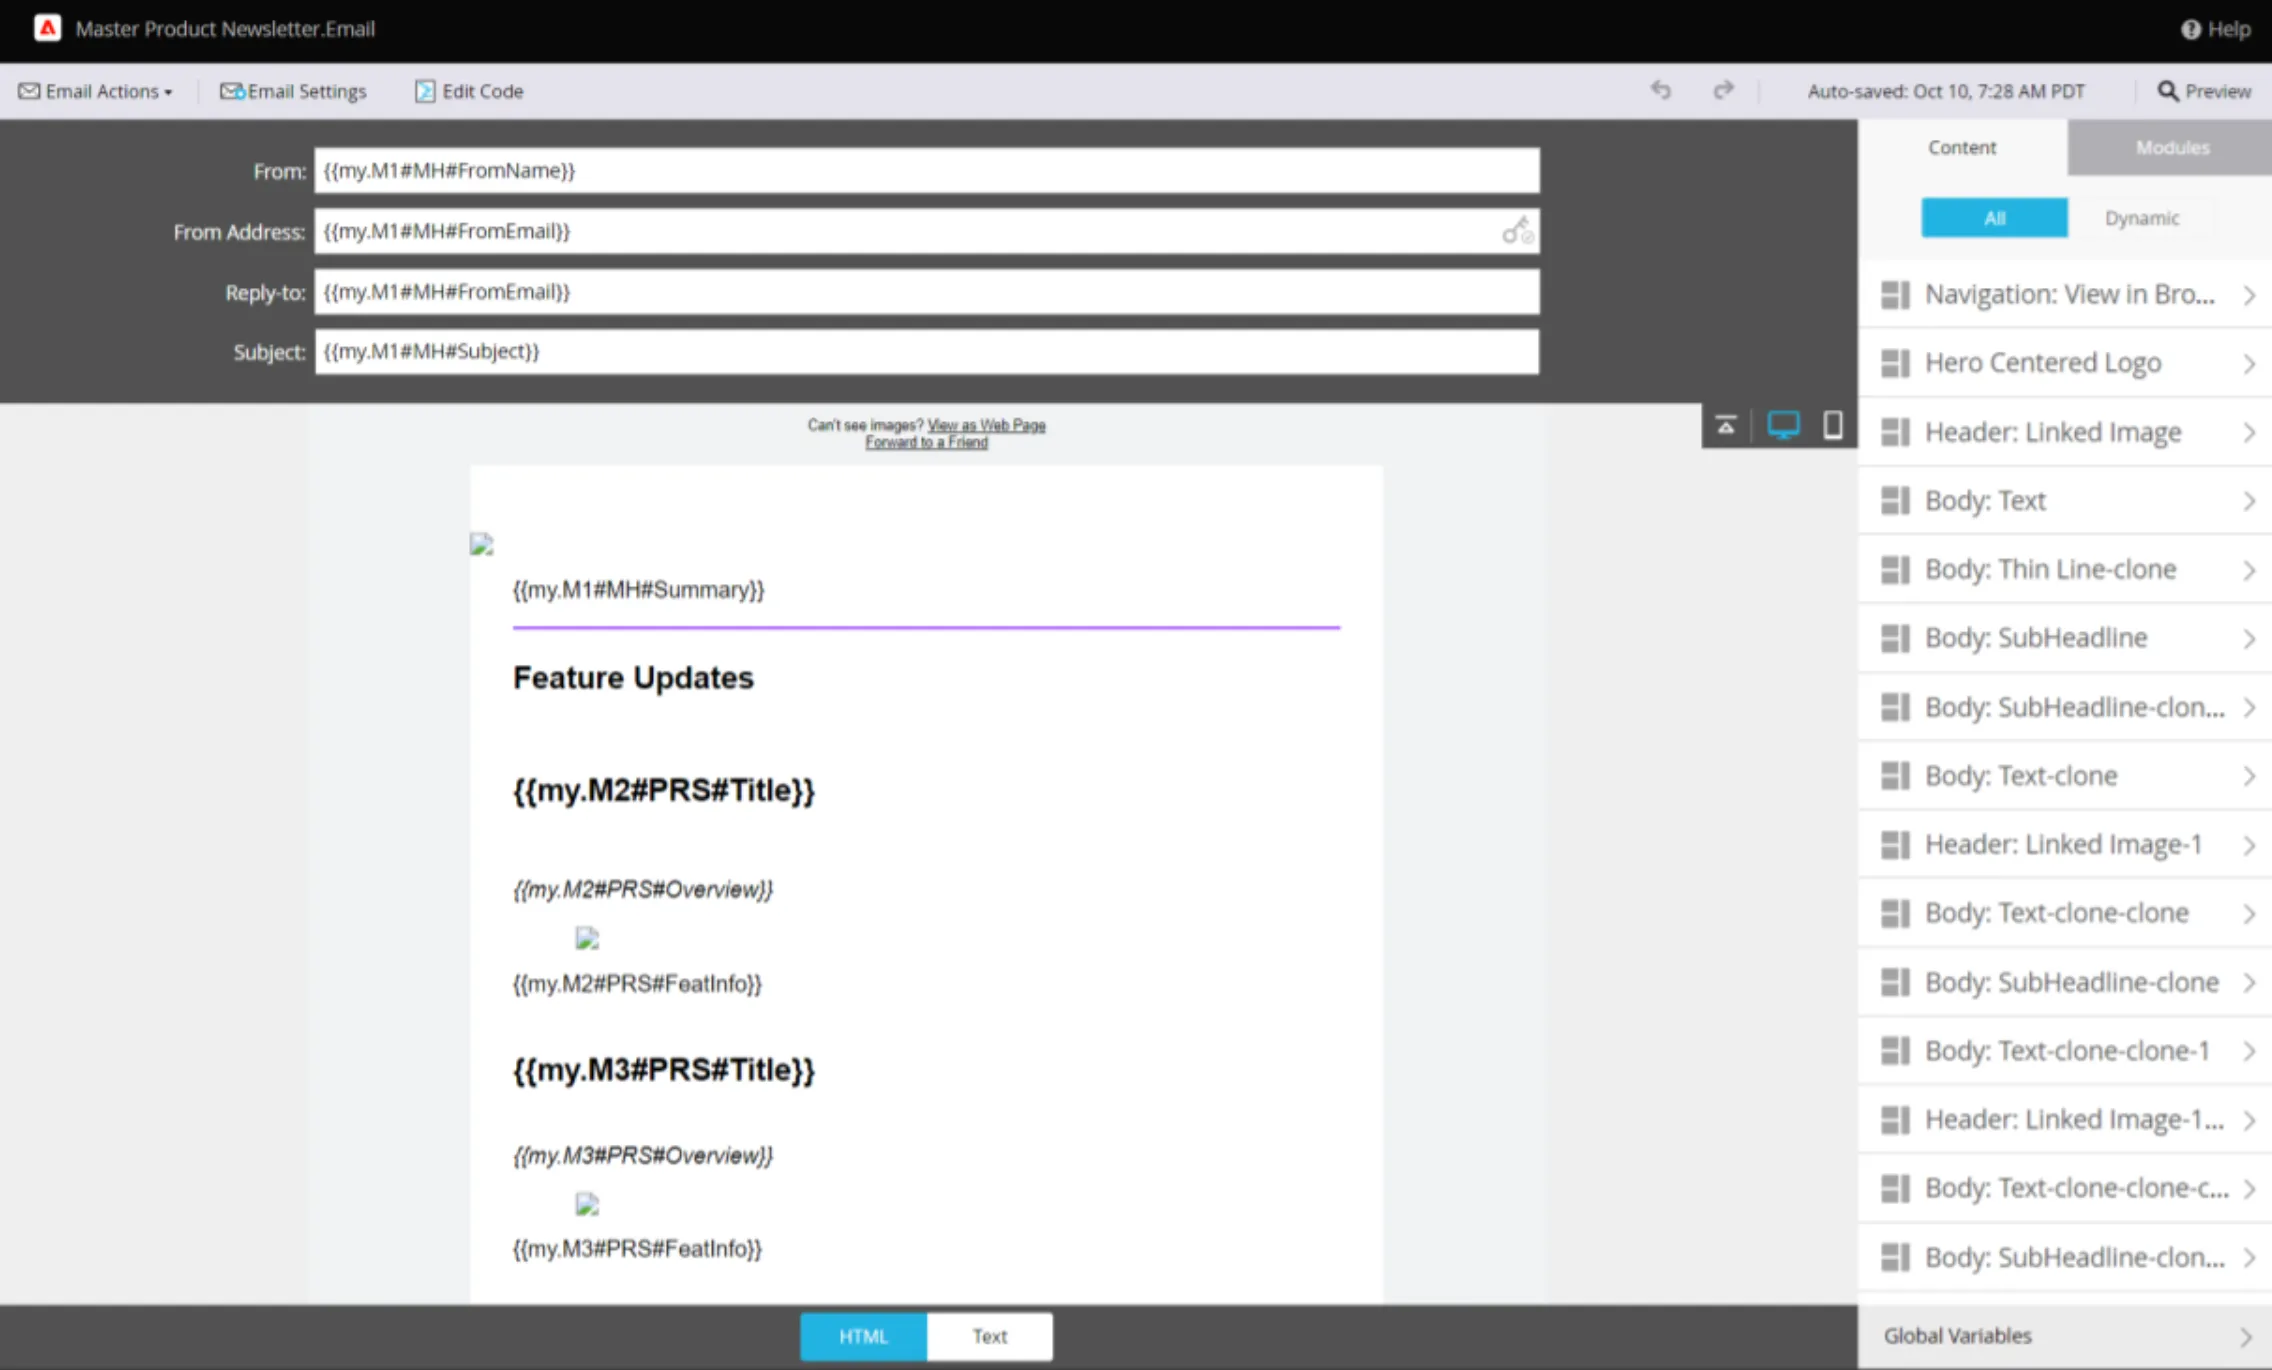
You should format text-based tokens within this design for integrated data to adopt the styling, such as marking the title field as bold.
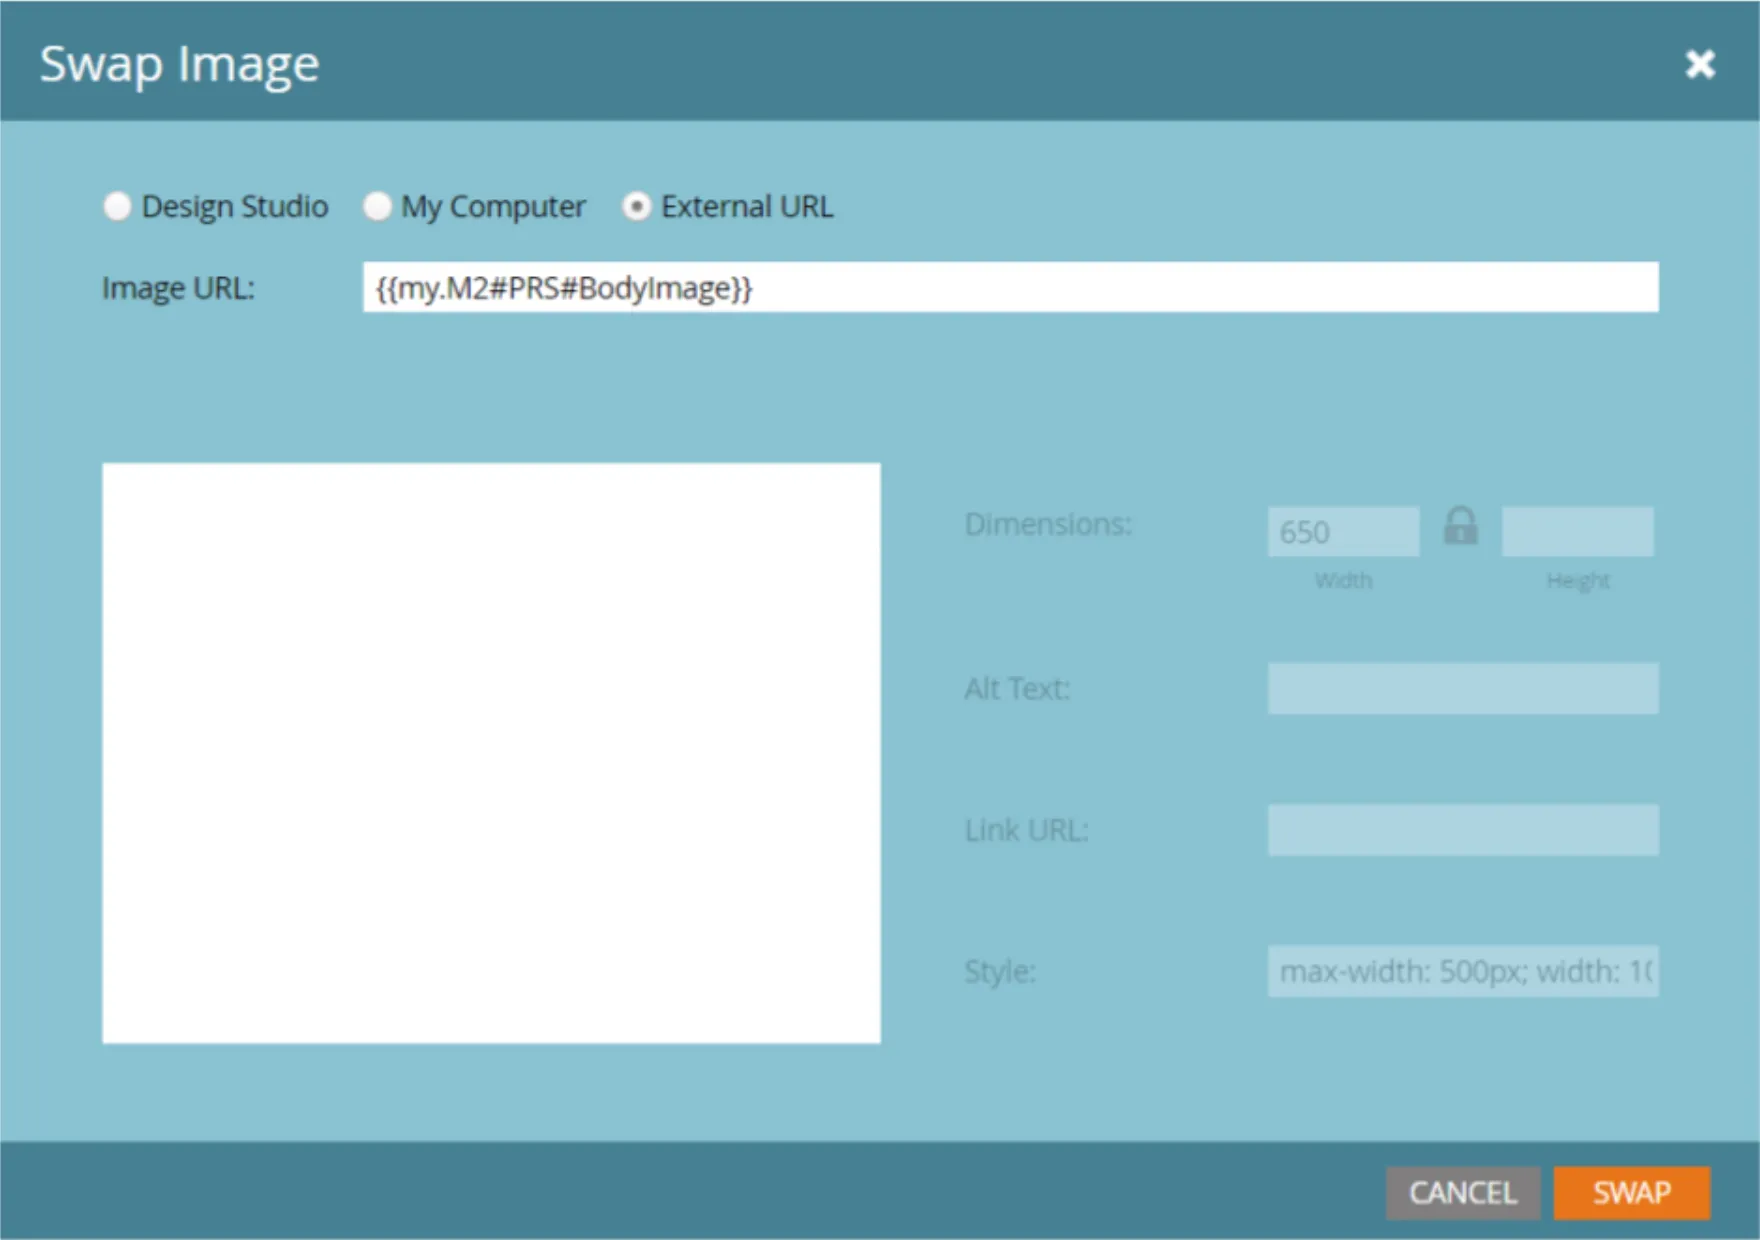
Marketo sets image-based tokens as external URLs. Go to Swap Image to set the token under External URL.
Approve email draft
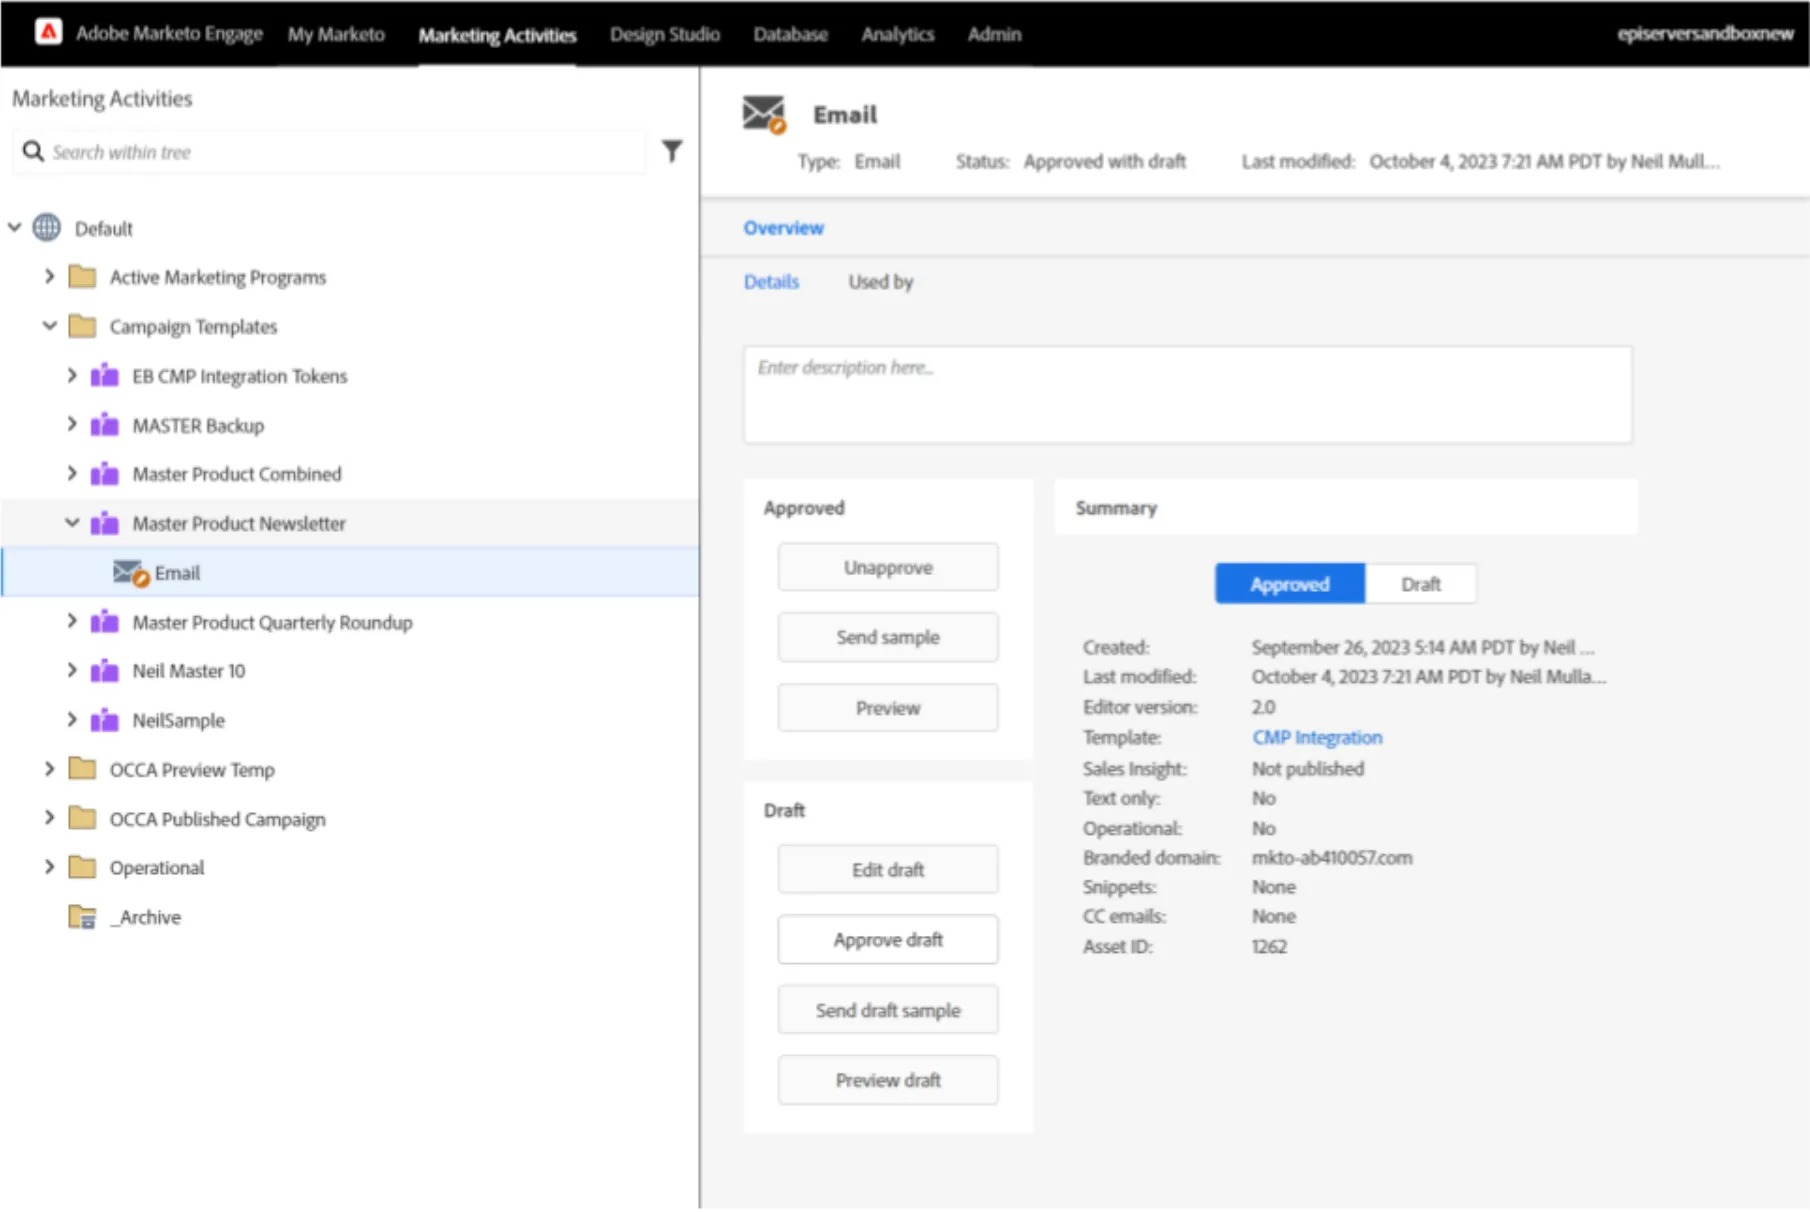
When you have set up your email, you need to approve the draft. Go to the email under Marketing Activities and click Approve.
API user creation
You must create an API use in Marketo with CRUD permissions for all programs and folders in Marketing Activities. See Integrate Marketo for information.
Copy the Client ID, Client Secret, and Base URL for later.
Configure CMP
You need a system app, two webhooks, and the components and content types for users to author. The system app and webhooks are available in the starter pack. To deploy, go to your avatar > Integrations > Marketo Omnichannel and click Connect Now.
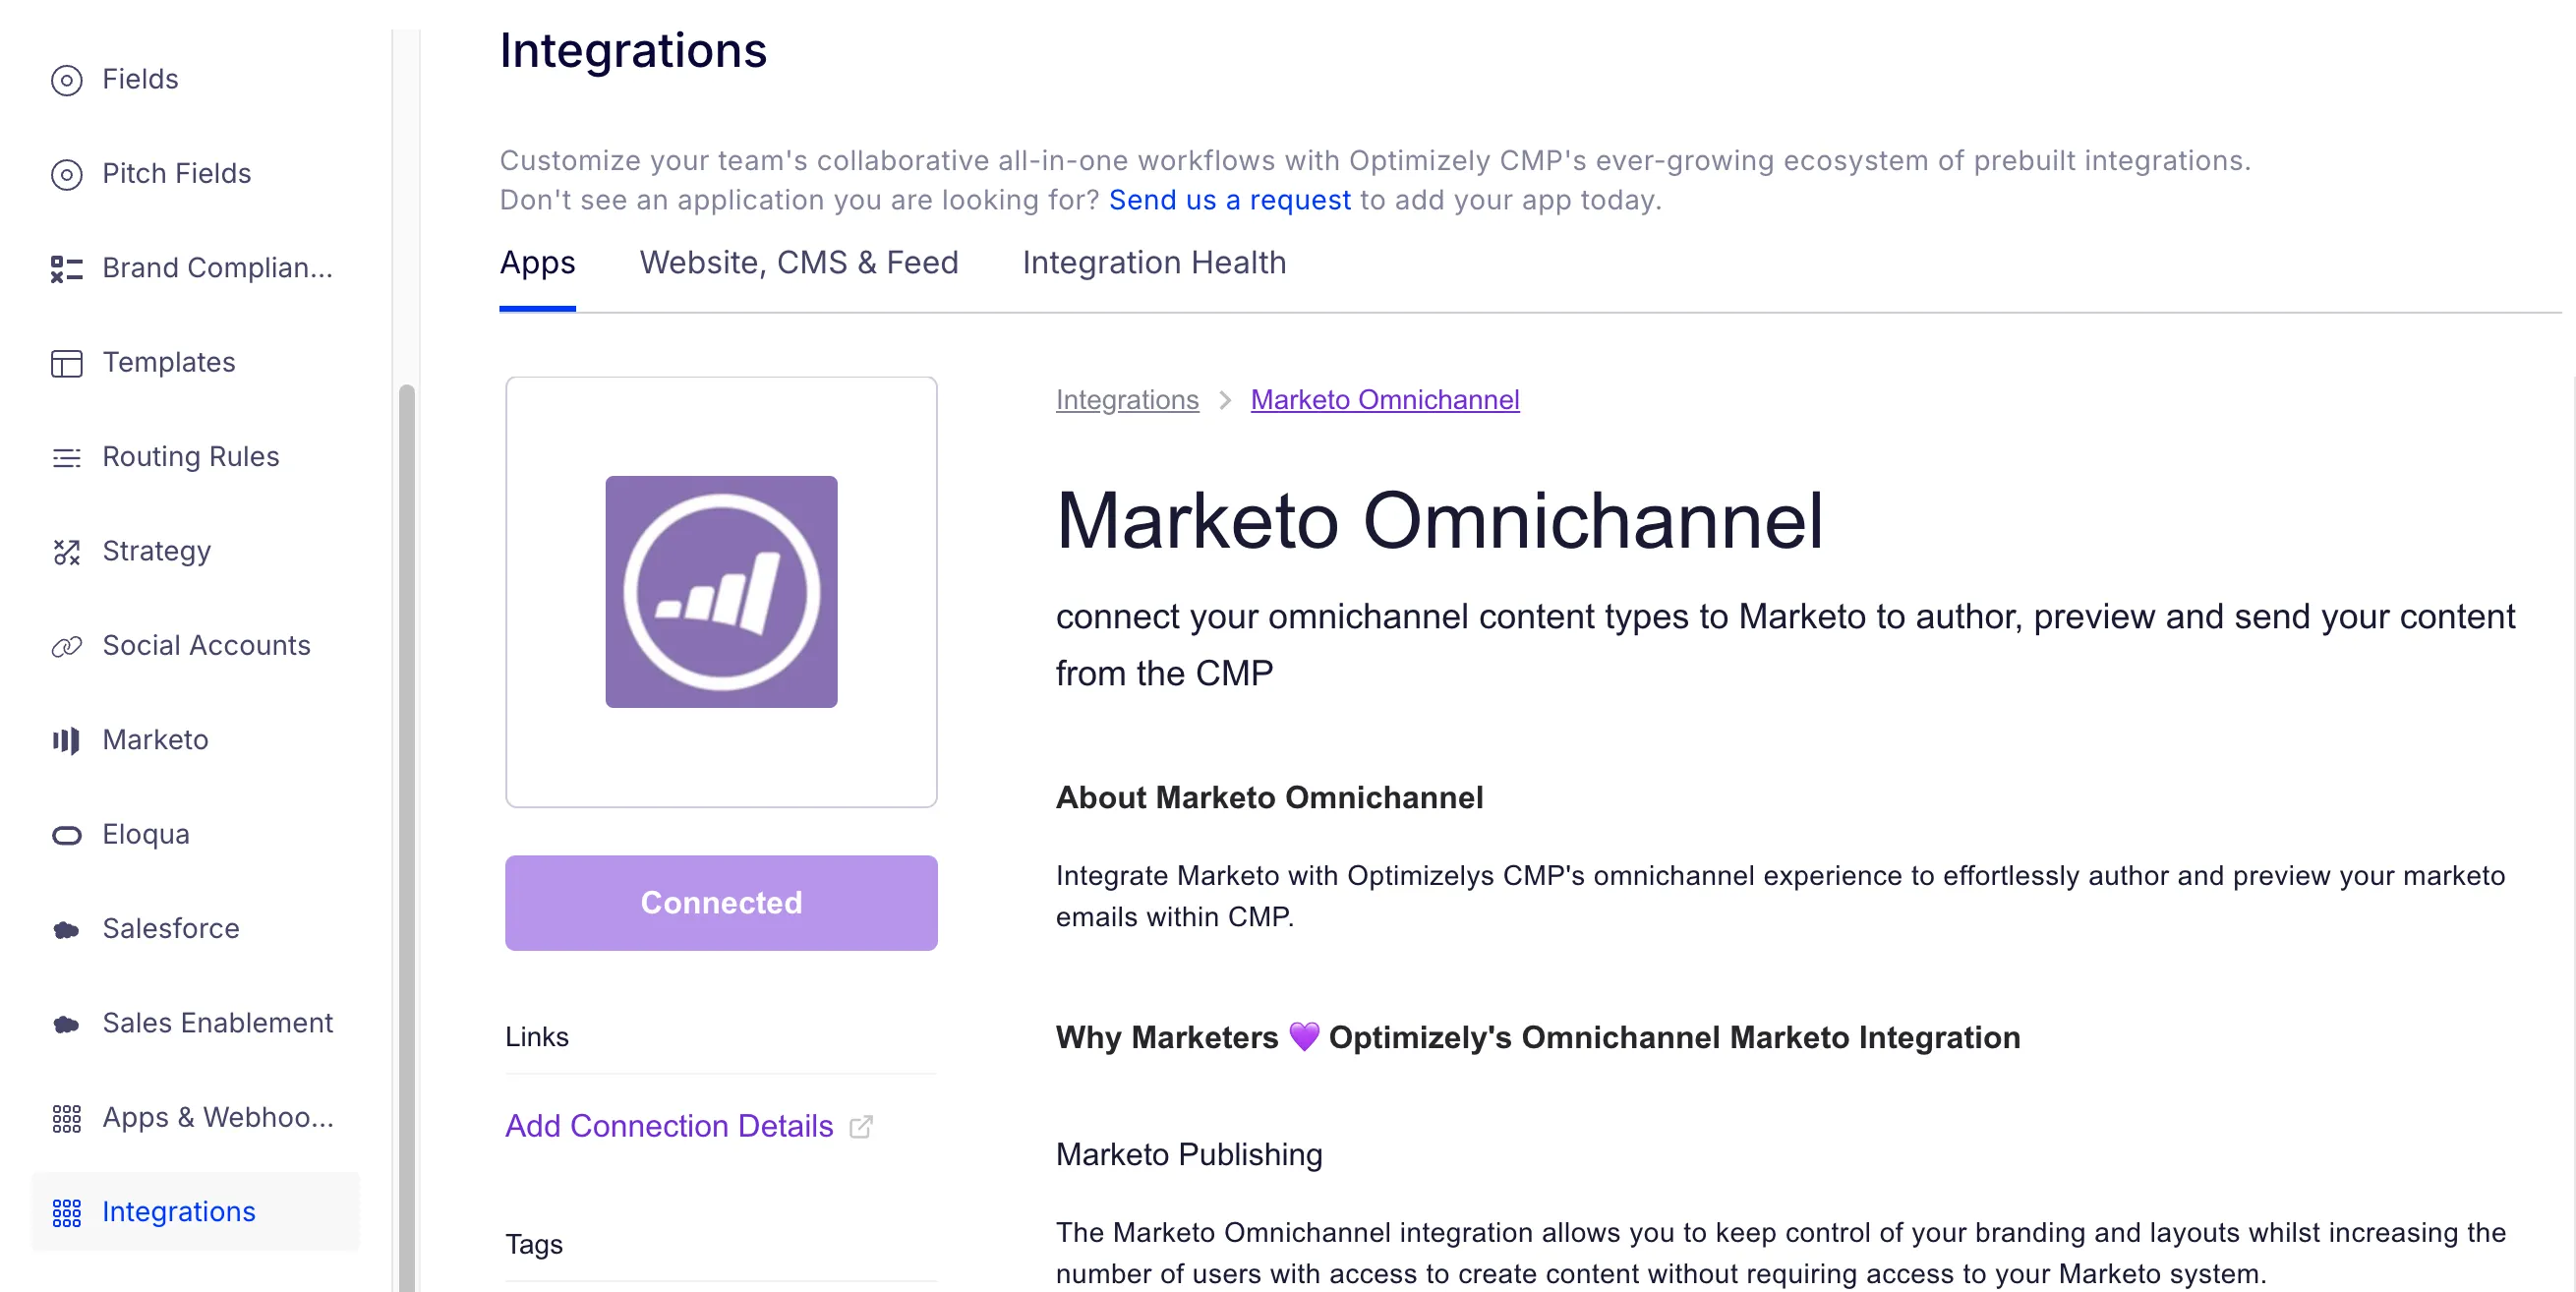
Click Add Connection Details to enter your Marketo API user details, similar to the following list:
- MARKETO_REST_URL – Retrieved from Marketo.
- Example: MARKETO_REST_URL=https://001-FXX-10X.mktorest.com
- MARKETO_CLIENT_ID – Retrieved from Marketo.
- Example: MARKETO_CLIENT_ID=91a2-87Xadc-jehfF-2fe1ef2
- MARKETO_CLIENT_SECRET – Retrieved from Marketo.
- Example: MARKETO_CLIENT_SECRET=907836491a287dHy
- PREVIEW_FOLDER_ID – The Marketo folder ID where previews are created temporarily.
- Example: PREVIEW_FOLDER_ID=262
- PUBLISH_FOLDER_ID – The Marketo folder ID where integrated programs and emails are created.
- Example: PUBLISH_FOLDER_ID=262
- APP_CLIENT_ID – Client ID of the app in CMP.
- Example: APP_CLIENT_ID=1hR4sg-ditN85
- APP_CLIENT_SECRET – Client app secret in CMP.
- Example: APP_CLIENT_SECRET=j7hdyrU-j48fhndY-Fc33
Configure content type and component
Create the content type and components based on your use case and way of working. You must reference the apifieldname in CMP for each type and individual field to map the document between the two platforms. You should store these names in an Excel file to speed up future deployments and to reuse existing mappings.
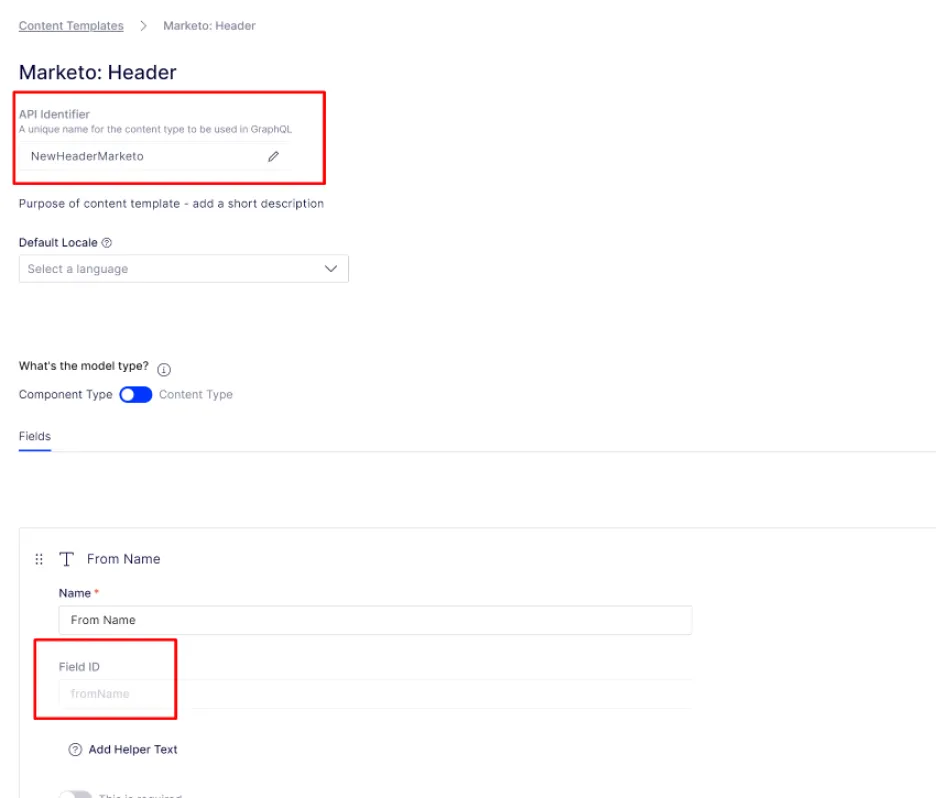
Mapping document
The mapping tells the integration how to move data from CMP fields to the tokens you added in Marketo. Paste the mapping into the Content Type Mapping field on the Configuration tab of the app settings.
The middleware code ships with a tokenConfig.js file that holds an example mapping. The integration reads tokenConfig.js only when Content Type Mapping is empty, so treat the file as a starting point rather than the place to keep your mapping.
📘 Note Token names in the mapping document exclude {{my.}}. This changes {{my.PRS1#text}} to PRS1#text.
Mapping rules
The integration matches the mapping against your CMP content types and fields by exact string. Follow these rules to avoid mismatches:
- Content type names are case-sensitive and must match the CMP content type name exactly. When a content type is missing from the mapping, the integration stops and creates nothing in Marketo.
- Field names are case-sensitive. Match the apifieldname in CMP exactly. bnInvitation and bninvitation refer to different fields.
- Keys must not hold leading or trailing spaces. A key such as "Marketo Single URL " matches no CMP field.
- Data type names are case-sensitive. A misspelled type, such as UrlField instead of URLField, leaves the token unmapped and the Marketo template default in place.
A field name that does not match CMP produces one of two results, depending on the field type:
Field type | Result when the field name does not match |
|---|---|
Rich text | The integration sends the token with an empty value |
Text, URL, choice, asset | The integration skips the token, and the default in the Marketo template stays |
File structure
The mapping holds one block for each CMP content type. Each block includes the following elements:
- Content type name – Name of the CMP content type, used as the key for the block. Example: "Marketo: Product Recap Newsletter": {
- programId – ID of the Marketo program that the integration clones as the template. Example: "programId": 12004,
- mapping – Holds one entry for each component in the content type.
- Component name – The apifieldname of the component in CMP. Example: "marketoHeader": {
- _type – The kind of field the entry maps. A component uses "_type": "Component".
- behaviour – Set to "List" when the author adds the component more than once. Omit it for a component used once.
- map – Pairs each CMP field with the Marketo token that receives its value.
- elements – For a component with "behaviour": "List", holds one map for each copy of the component, in order. The first element fills the tokens for the first copy the author adds, the second element the second copy, and so on. The integration does not send a copy that has no matching element.
Each field in a map entry declares the data type of the CMP field it reads. Write the type exactly as shown, because the names are case-sensitive:
Type | CMP field | Value sent to the Marketo token |
|---|---|---|
TextField | Text | The text |
RichTextField | Rich text | The formatted text |
URLField | URL | The link |
ChoiceField | Choice | The internal key of the choice, not the label the author sees |
AssetField | Library asset | A link to the asset |
Component | Component | No value. The fields inside the component carry the values |
The following example maps the CMP fromName field to the Marketo token M1#MH#FromName:
                "map": {
                    "fromName": {
                        "_type": "TextField",
                        "mktoToken": "M1#MH#FromName"
                    },
Example file
The following example is a simple configuration with two components: marketoHeader and productReleaseSummary. Because the author adds productReleaseSummary to the email more than once, it is declared as a list.
If the component permits multiple entries, the mapping document should repeat the list to the maximum number of times set in your content type. For example, max=5 duplicates five times in the JSON file.
{
    "Marketo: Product Recap Newsletter": {
        "programId": 12004,
        "mapping": {
            "marketoHeader": {
                "_type": "Component",
                "map": {
                    "fromName": {
                        "_type": "TextField",
                        "mktoToken": "M1#MH#FromName"
                    },
                    "preheader": {
                        "_type": "TextField",
                        "mktoToken": "M1#MH#Preheader"
                    },
                    "summary": {
                        "_type": "RichTextField",
                        "mktoToken": "M1#MH#Summary"
                    },
                    "bannerImage": {
                        "_type": "AssetField",
                        "mktoToken": "M1#MH#BannerImage"
                    },
                    "subject": {
                        "_type": "TextField",
                        "mktoToken": "M1#MH#Subject"
                    },
                    "fromEmail": {
                        "_type": "TextField",
                        "mktoToken": "M1#MH#FromEmail"
                    }
                }
            },
            "productReleaseSummary": {
                "_type": "Component",
                "behaviour": "List",
                "elements": [
                    {
                        "map": {
                            "overview": {
                                "_type": "TextField",
                                "mktoToken": "M2#PRS#Overview"
                            },
                            "image": {
                                "_type": "AssetField",
                                "mktoToken": "M2#PRS#BodyImage"
                            },
                            "title": {
                                "_type": "TextField",
                                "mktoToken": "M2#PRS#Title"
                            },
                            "featureInformation": {
                                "_type": "RichTextField",
                                "mktoToken": "M2#PRS#FeatInfo"
                            }
                        }
                    },
                    {
                        "map": {
                            "overview": {
                                "_type": "TextField",
                                "mktoToken": "M3#PRS#Overview"
                            },
                            "image": {
                                "_type": "AssetField",
                                "mktoToken": "M3#PRS#BodyImage"
                            },
                            "title": {
                                "_type": "TextField",
                                "mktoToken": "M3#PRS#Title"
                            },
                            "featureInformation": {
                                "_type": "RichTextField",
                                "mktoToken": "M3#PRS#FeatInfo"
                            }
                        }
                    }
                ]
            }
        }
    }
}
Publish
Publish your finished content to Marketo so your team schedules and sends the email from Marketo. The integration clones the template program, replaces the Marketo tokens with your CMP field values, and creates the program and email in your publish folder.
- Open your content in Tasks and complete the fields defined by the content type.
- Select Marketo as the publishing channel.
- Publish the content. Publishing usually completes within a minute.
- In Marketo, open the folder set in PUBLISH_FOLDER_ID and confirm that the program and email exist.
- Open the email and confirm that each token holds the value from CMP.
Verify a publish
The integration responds after it creates the program in Marketo, so a success response normally means the program exists. One case breaks this rule: when the content type is missing from the mapping, the integration stops without creating anything and does not report an error.
If publish shows no error and no program appears in Marketo, check that the content type name in the mapping matches the CMP content type name exactly, including capital letters.
A working preview does not confirm that publish works. Preview and publish follow separate paths through the middleware. Test each operation and check the result in Marketo.
The integration clones the template into the folder set in PREVIEW_FOLDER_ID when it generates a preview, then deletes the clone after it extracts the content. An empty preview folder is expected. The integration occasionally leaves a preview copy behind. The copy is harmless and you can delete it.
Troubleshoot the integration
Start with the Hosted App logs when preview or publish fails. The middleware logs every request and every call to Marketo and CMP, including errors and a request ID, so the logs usually identify the cause without a code change.
Check the Hosted App logs
- In CMP, go to Settings > Apps & Webhooks.
- Open the app named Optimizely Marketo.
- Open the App Details tab and click View Logs. The log viewer opens on Latest Build Logs. Select Application Logs.
- Reproduce the failure with preview or publish.
- Read the entries for that request and record the operation, the timestamp, the error message, and the request ID.
Publish errors reach the logs and CMP. Preview errors reach the logs only.
To capture more detail, raise the log level rather than change the code. In the app settings, go to Configuration > Log Level (info or debug) and enter debug. Saving the change redeploys the app at the new level. Set the level back to info when you finish. An app installed from an earlier version of the integration may not hold this setting.
Common symptoms
Symptom | Likely cause | Check |
|---|---|---|
Publish shows no error and Marketo holds no program or email | The content type is missing from the mapping, or its name does not match CMP exactly | Content type names in Configuration > Content Type Mapping |
Preview never appears for one content type | The content type is missing from the mapping, or its name does not match CMP exactly | Content type names in Configuration > Content Type Mapping |
Preview or publish returns HTTP 500 | A call to Marketo or CMP failed | The log entry for that request, which holds the error and the request ID |
Some tokens hold values and others stay empty | Field names in the mapping do not match the apifieldname values in CMP | Casing and trailing spaces in the field names in Configuration > Content Type Mapping |
A token in the Marketo program still shows the template default | The _type of the field is misspelled, such as UrlField instead of URLField | _type values in Configuration > Content Type Mapping |
The Marketo preview folder holds no assets | Expected behavior | No action. The integration deletes the preview clone after it extracts the content |
Update the middleware
Change the middleware source as a last resort, when the logs identify a code-level problem or when the app predates the Log Level setting. You reach the code with an SSH key you add in CMP, so you do not need an AWS account.
Warning
A push to the master branch deploys to the live app with no further step. Test your change before you push.
- On the app's App Details tab, click Add SSH Key and add your public SSH key. The link opens Settings > Organization > SSH Keys, which you can also reach directly. CMP accepts RSA keys only, and an organization holds a limited number of keys, so remove the keys you no longer use. For the full procedure, see Add SSH keys.
- Copy the value of the Repository field on the App Details tab.
- Clone the repository and locate the code that handles the failing preview or publish operation. For implementation reference, see the Marketo middleware sample repository.
- Make the corrective change, or add diagnostic logging around the failing operation and the external API call. Do not log client secrets, access tokens, credentials, or other sensitive data.
- Push the change to the master branch. See Push code to AWS CodeCommit repository.
- Monitor the build in CMP. The status moves through Ready to build, Building, and then Deployed or Build failed. The app accepts requests when the status reaches Ready to use.
- Retest preview and publish separately and check the logs after each test.
Information to capture
Collect the following details before you raise a support ticket:
- CMP organization and the affected task or content item
- The operation that failed, either preview or publish
- Reproduction time and time zone
- Relevant Hosted App log entries
- Build result after any code change
- Result of the preview and publish tests after deployment