Custom fields in Web Experimentation
Products
- Optimizely Web Experimentation
- Optimizely Personalization
The availability of features may depend on your plan type. Reach out to your Customer Success Manager if you have any questions.
Custom fields add required or optional metadata to experiments and campaigns, going beyond standard properties such as name, key, and description. When collaborators must enter these fields to create an experiment or campaign, your workflow gains structure and accountability.
Use custom fields to do the following:
- Capture domain-specific details such as Jira links, page names, or categories.
- Improve reporting and tracking across projects.
- Filter, sort, and group experiments and campaigns for quick access and better discoverability.
Custom fields make it easier to manage experiments and campaigns at scale.
Benefits of custom fields
Custom fields provide the following benefits for managing and scaling experimentation programs:
- Organization and clarity – Categorize experiments and campaigns for easier management and improved discoverability through enhanced filtering.
- Improved insights – Use custom fields in dashboards and reports to analyze impact across multiple dimensions.
- Scalability and efficiency – Provide structured tagging to reduce duplicate experiments and minimize configuration errors in large organizations.
- Enhanced collaboration – Promote a unified approach to experimentation across teams and simplify experiment reviews with consistent metadata.
Create custom fields
Note
Only administrators and project owners can create custom fields.
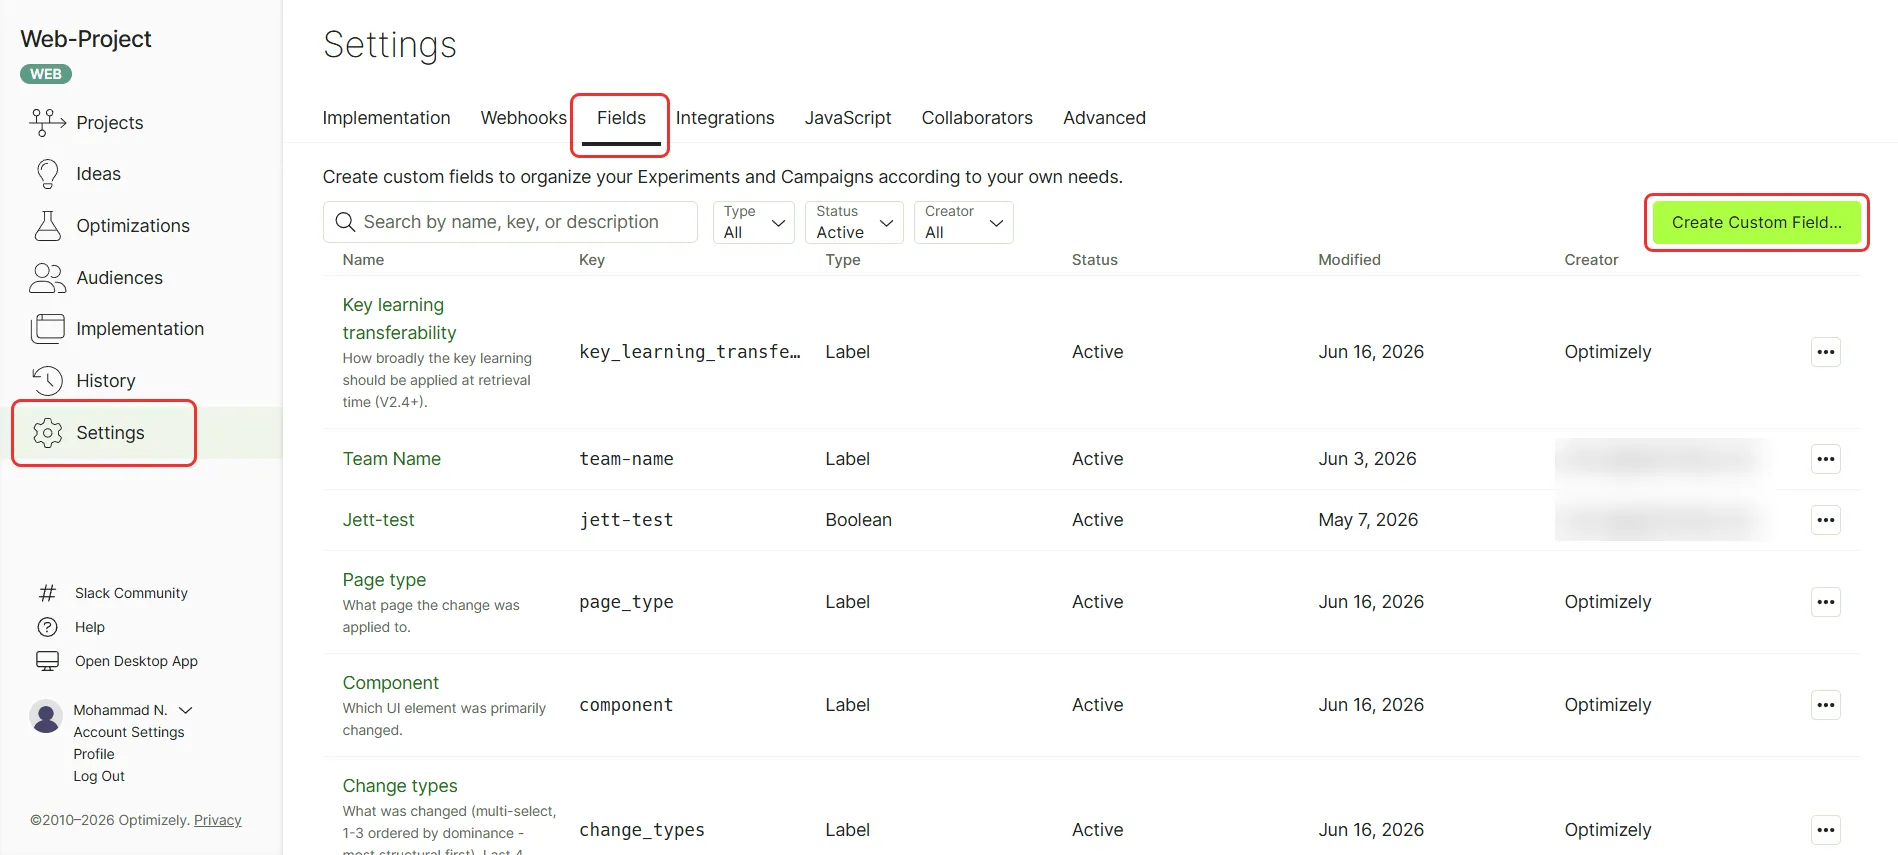
- Go to Settings > Fields.
- Click Create Custom Field.
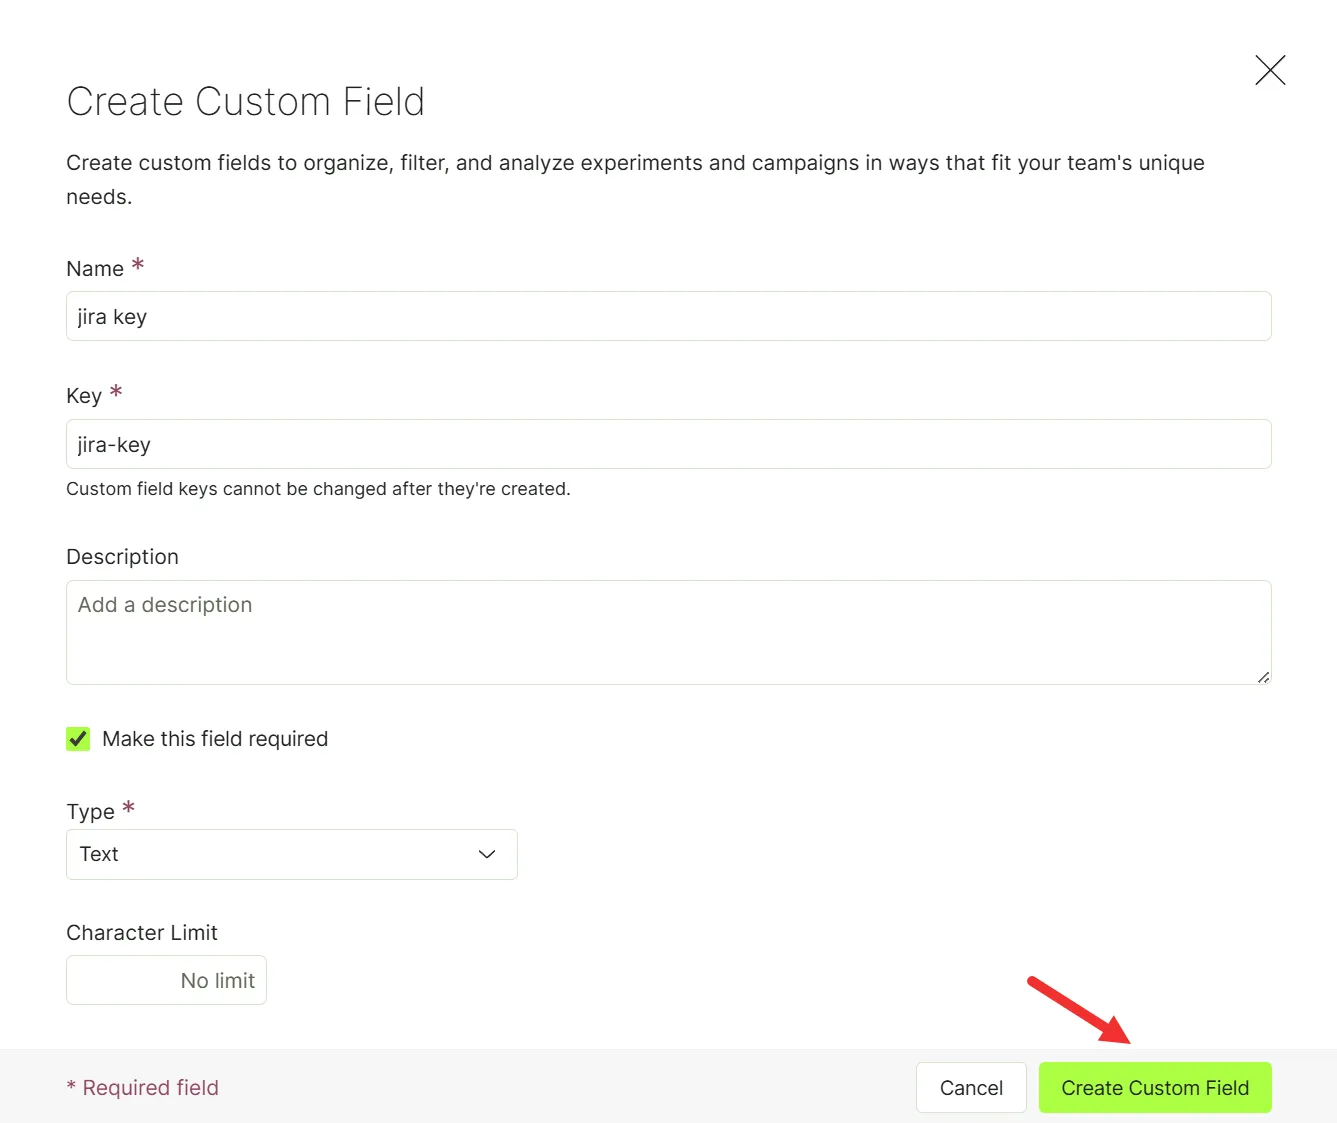
- Enter a Name for the custom field and, optionally, a Description.
- Select the Make this field required checkbox to require collaborators to enter a value when they create an experiment or campaign.
- Select an option from the Entities drop-down list to choose whether the custom field applies to Experiments or Campaigns. A custom field applies to one entity type, and you cannot change the entity type after you create the field.
- Select the Type of custom field. The type controls what collaborators enter or select when they fill in the field on an experiment or campaign.
- Label – A predefined list of values. Select Allow multi-select to permit multiple selections.
- Text – Free-form text. Set a Character Limit to restrict the number of characters allowed.
- Numerical – A number within a range you define. Set the range, specify decimal places, and choose whether to format thousands with a comma separator.
- Link – Any URL.
- Boolean – A true or false selection.
- Click Create Custom Field to save the field.
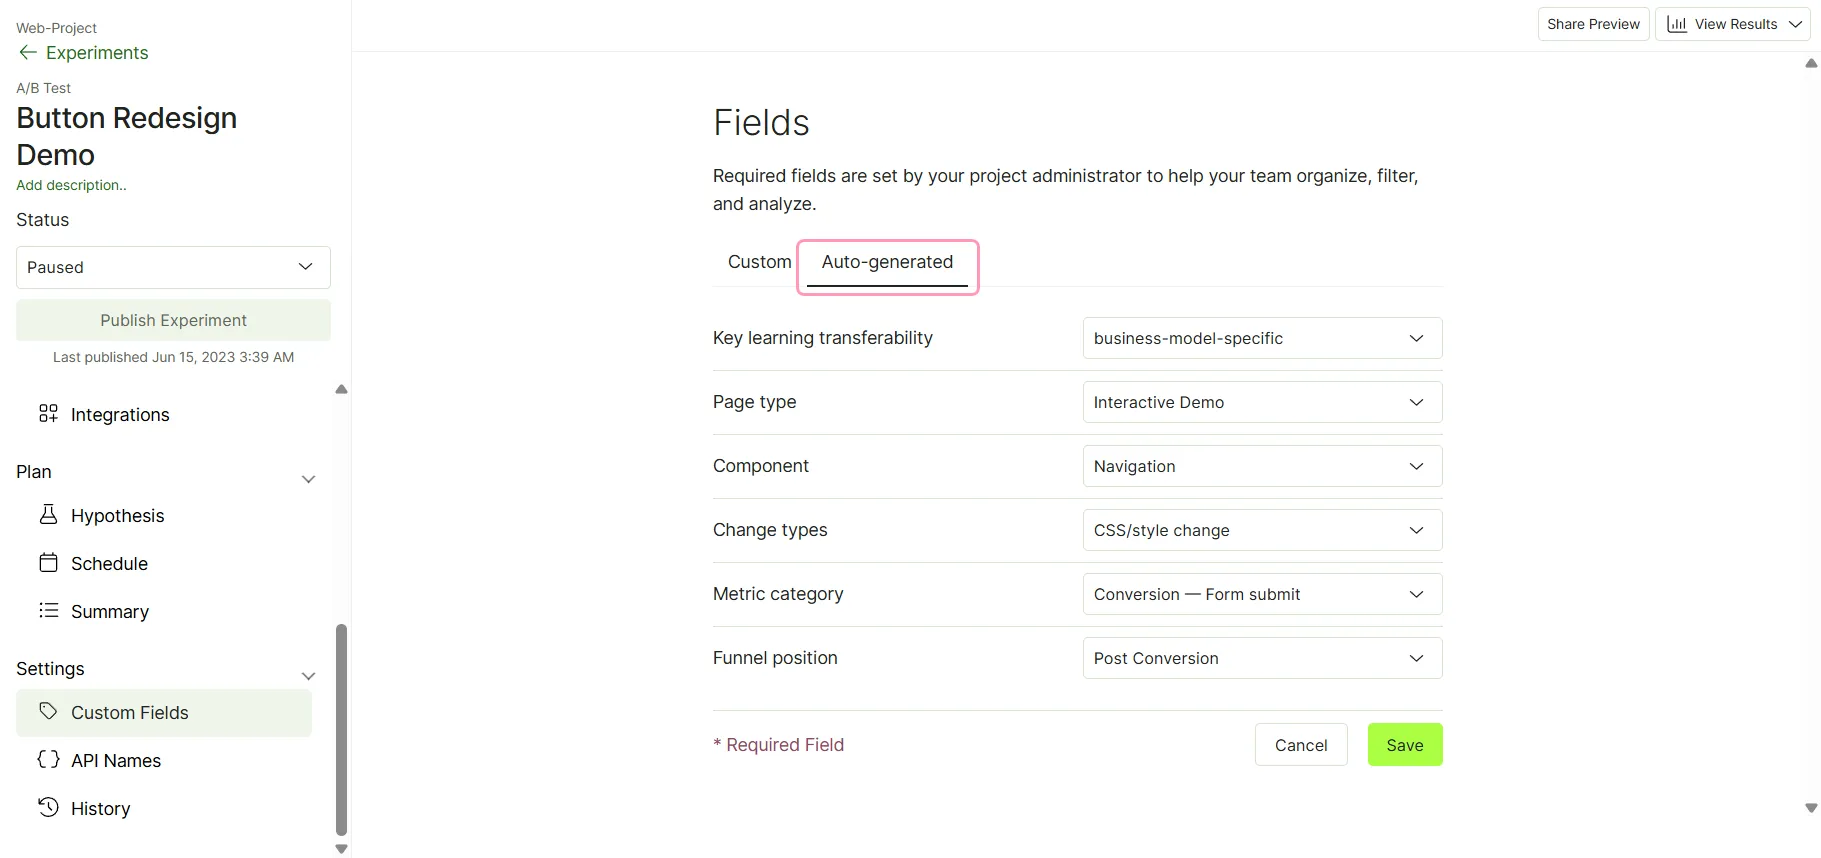
Auto-generated fields
Optimizely generates a set of custom fields for your project automatically. These fields capture common experiment metadata, so your team gets consistent, structured tagging without manual setup.
Find auto-generated fields on the Fields page. These fields show Optimizely as the Creator, which distinguishes them from the fields you create. Each auto-generated field uses the Label type.
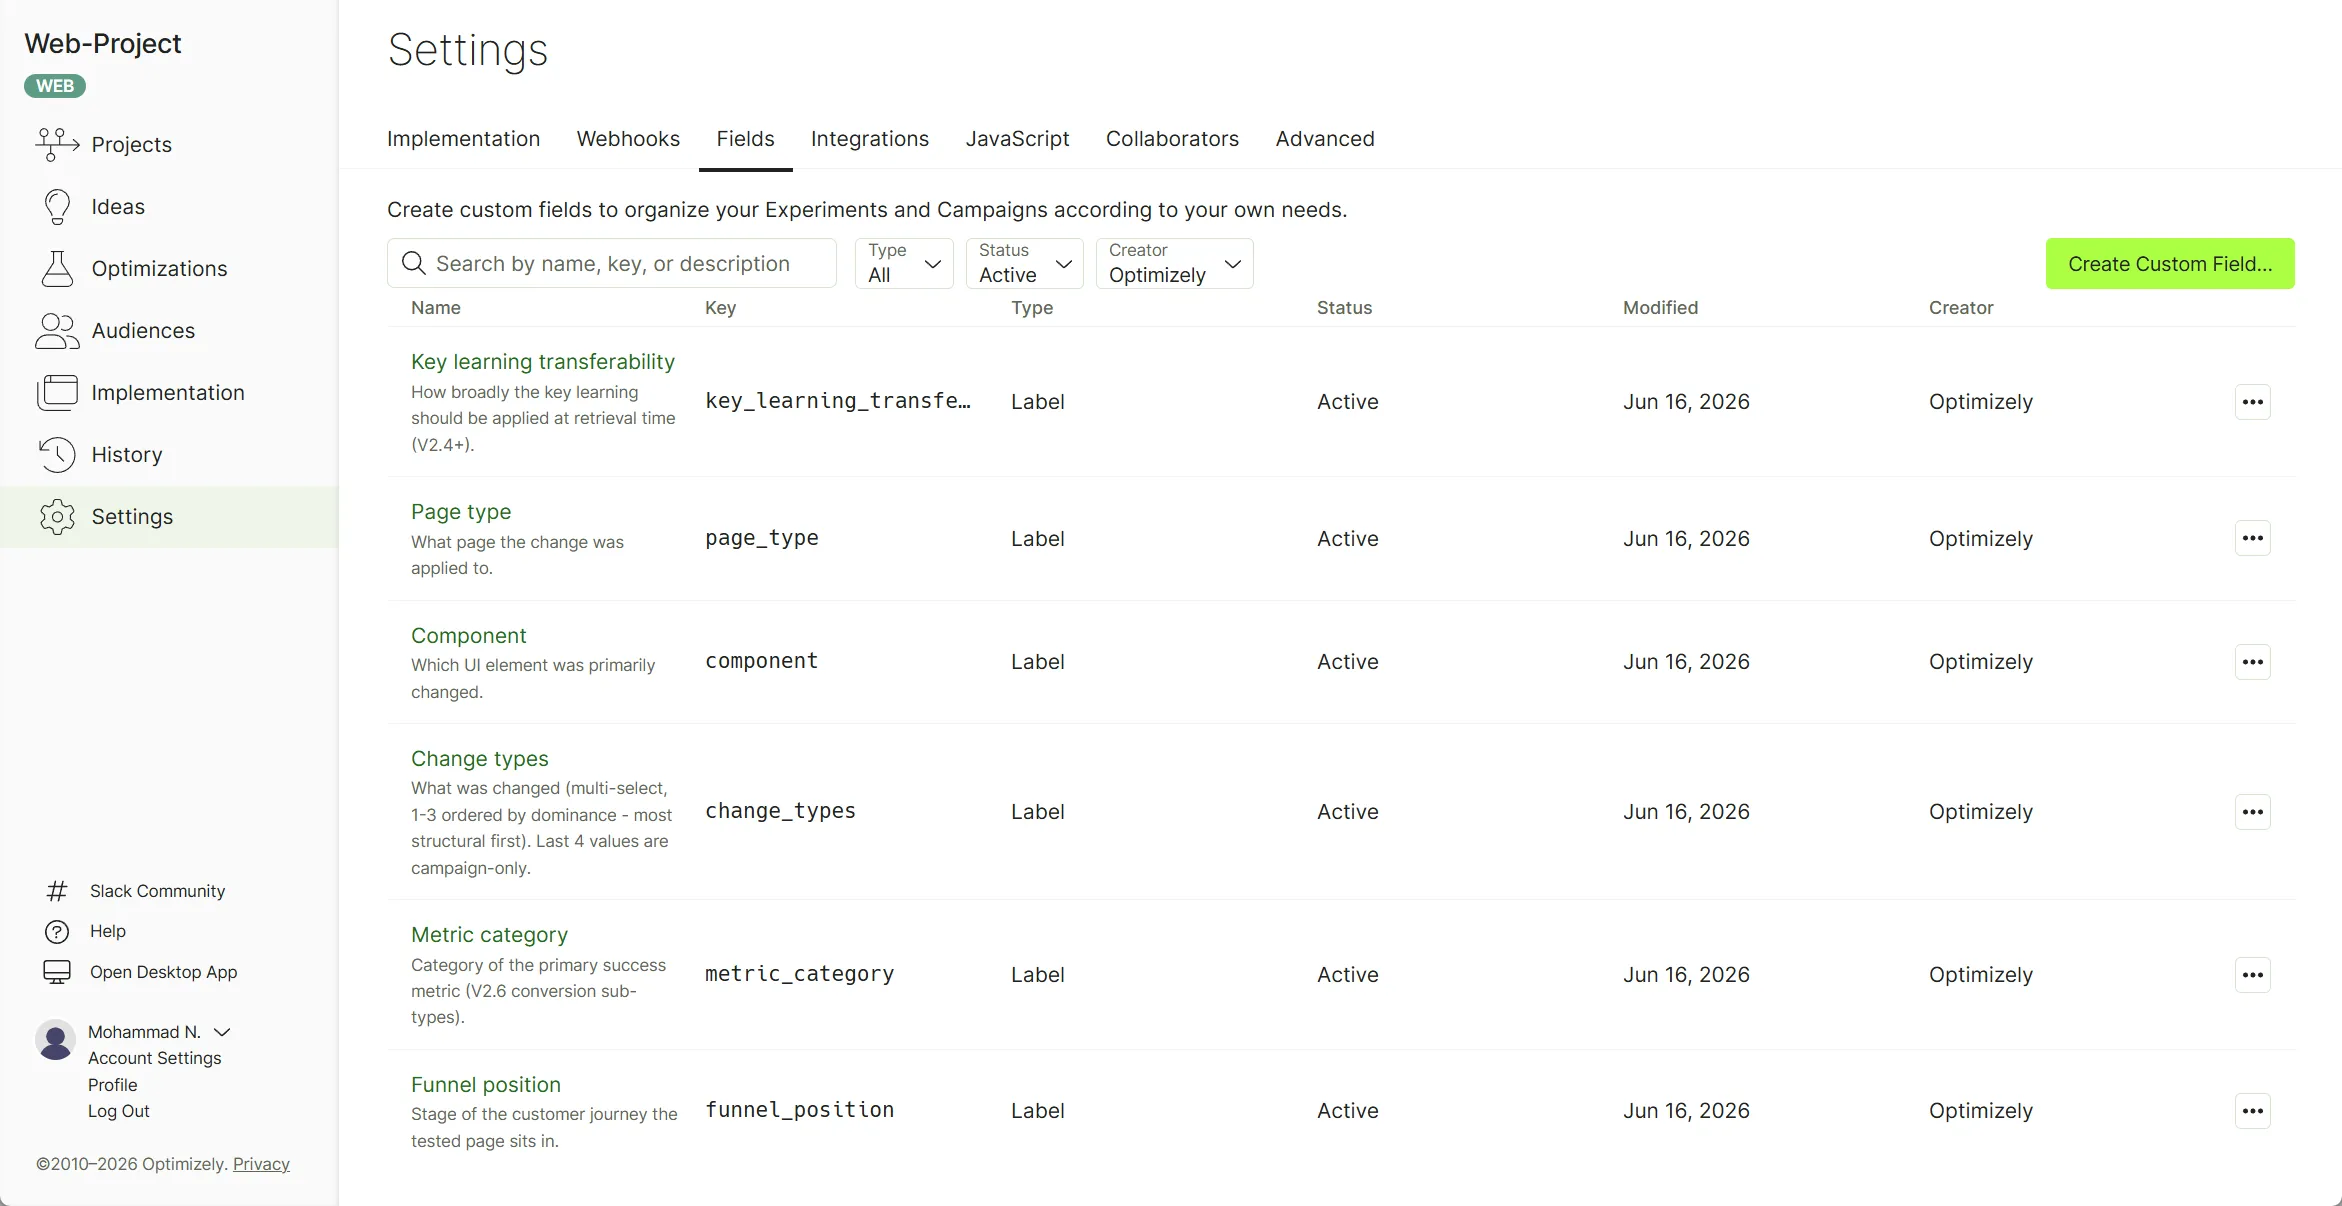
Optimizely generates the following fields:
- Page type – The page the change affected.
- Component – The UI element that changed.
- Change type – The kind of change made. When multiple changes apply, select the largest or most structural change.
- Metric category – The category of the primary success metric.
- Funnel position – The stage of the customer journey the tested page belongs to.
- Key learning transferability – How broadly the key learning applies, such as universal, vertical-specific, or site-specific.
Auto-generated fields display as filters on the Optimizations dashboard to help you find the experiments that matter to you.
Note
Optimizely populates auto-generated field values for each experiment when you publish it. Edit these values at any time, including before you publish.
Edit custom fields
Go to Settings > Fields.
The Fields page lists all custom fields. Use the search box to find a field by name or key. Filter by Type or Status using the drop-down lists.
Click More options (...) > Edit for the field you want to edit.
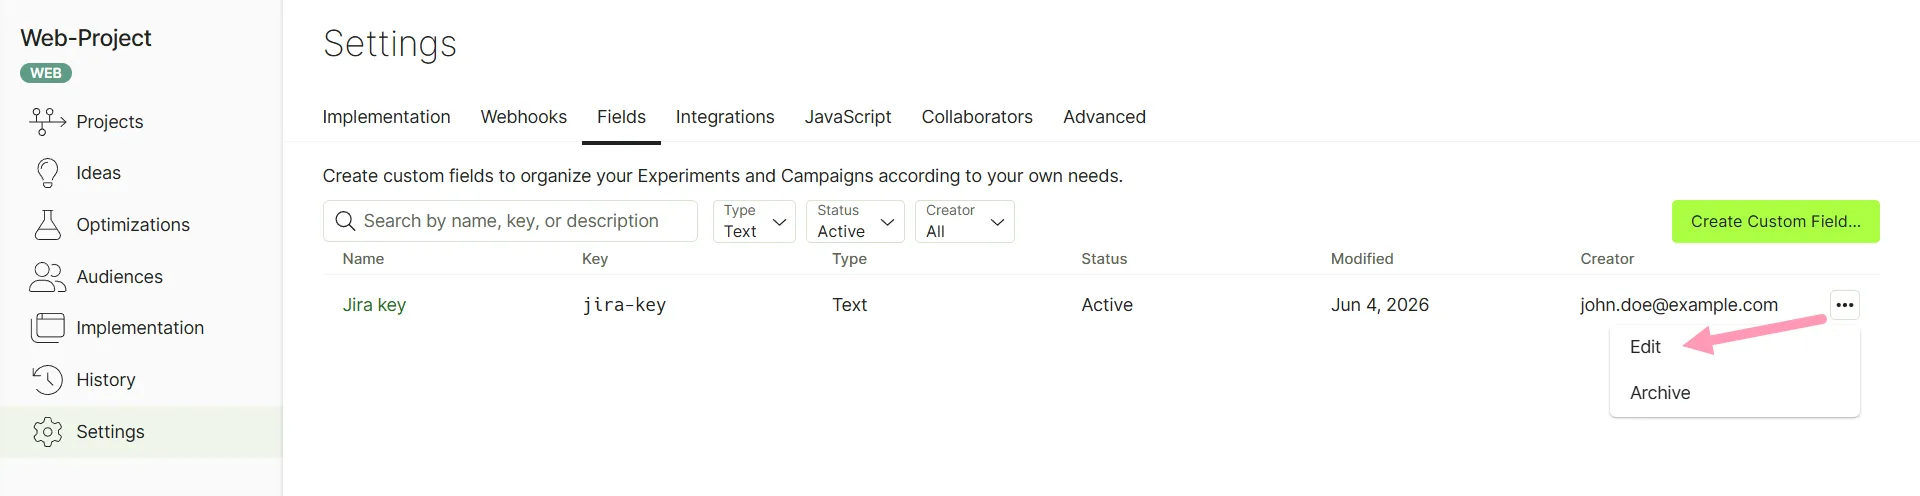
Make the necessary changes and click Save.
Note
You can only edit the Name and Description of a custom field. Optimizely manages auto-generated field definitions, so you cannot edit them. You can still update auto-generated field values on each experiment at any time.
Archive custom fields
Archive a custom field to remove it from the list of custom fields.
Note
Optimizely Web Experimentation retains your custom field data so you can unarchive it later.
- Go to Settings > Fields.
- Click More options (...) for the field.
- Click Archive.
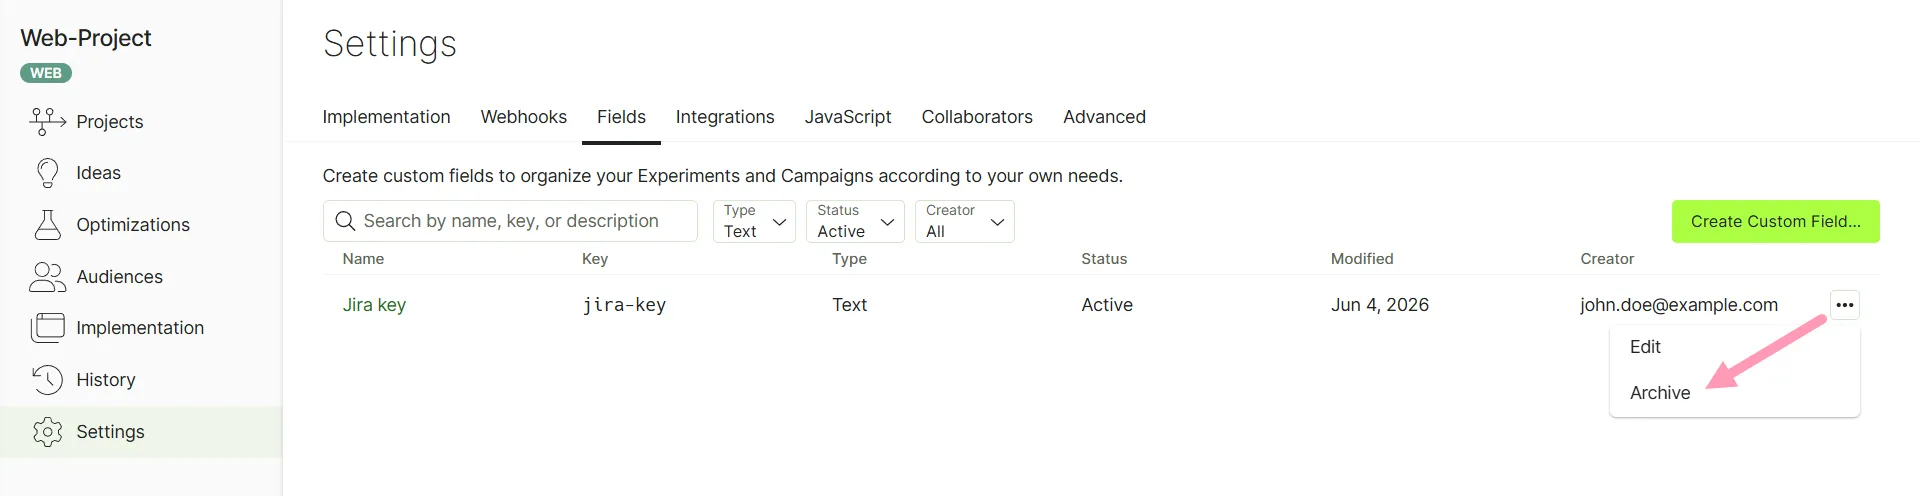
Note
You cannot archive auto-generated fields.
Unarchive custom fields
To unarchive a field, complete the following steps:
- Go to Settings > Fields.
- Select Archived for the Status.
- Click More options (...) for the field.
- Click Unarchive.
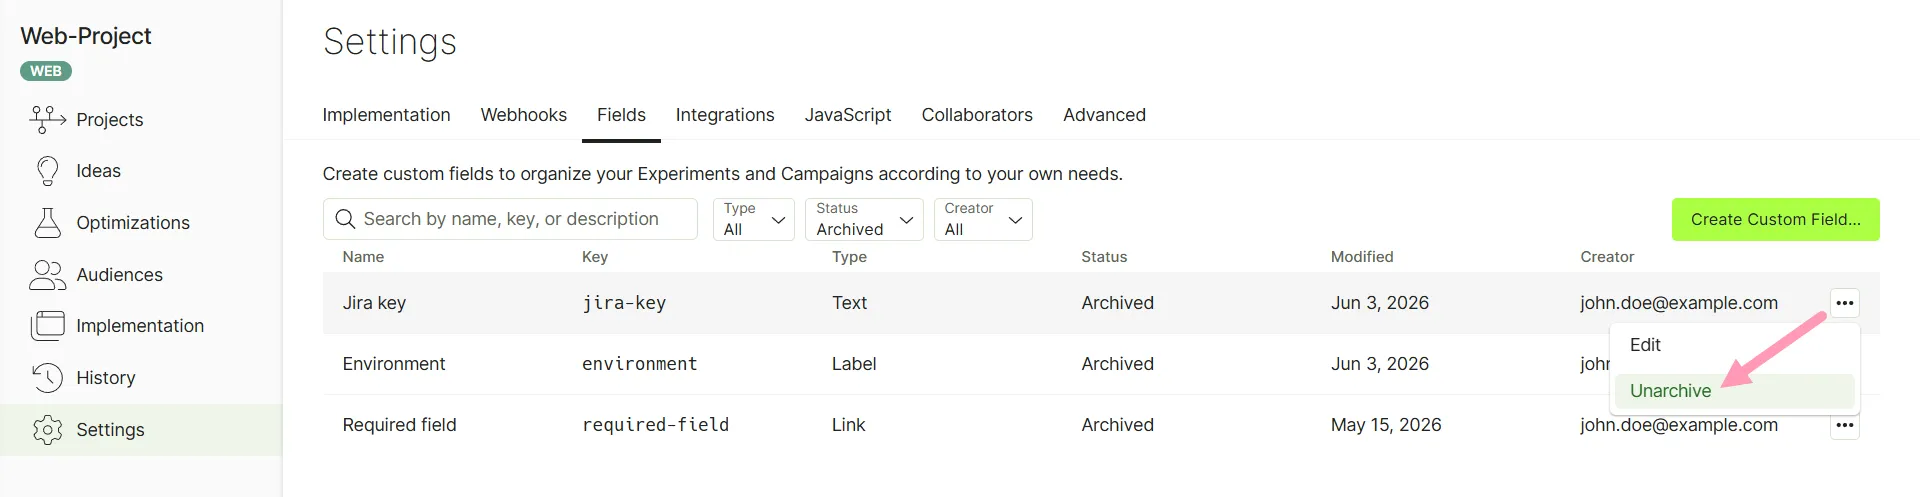
Set custom field values on experiments and campaigns
When a custom field applies to experiments or campaigns, it displays in the Custom Fields section. Collaborators enter values when they create or edit an experiment or campaign. For the full experiment workflow, see Steps to create an experiment.
The administrator defines which fields display and which fields are required. Required fields display with an asterisk.
- Open the experiment or campaign, then go to Settings > Custom Fields.
- Enter or update the custom field values.
- Click Save.
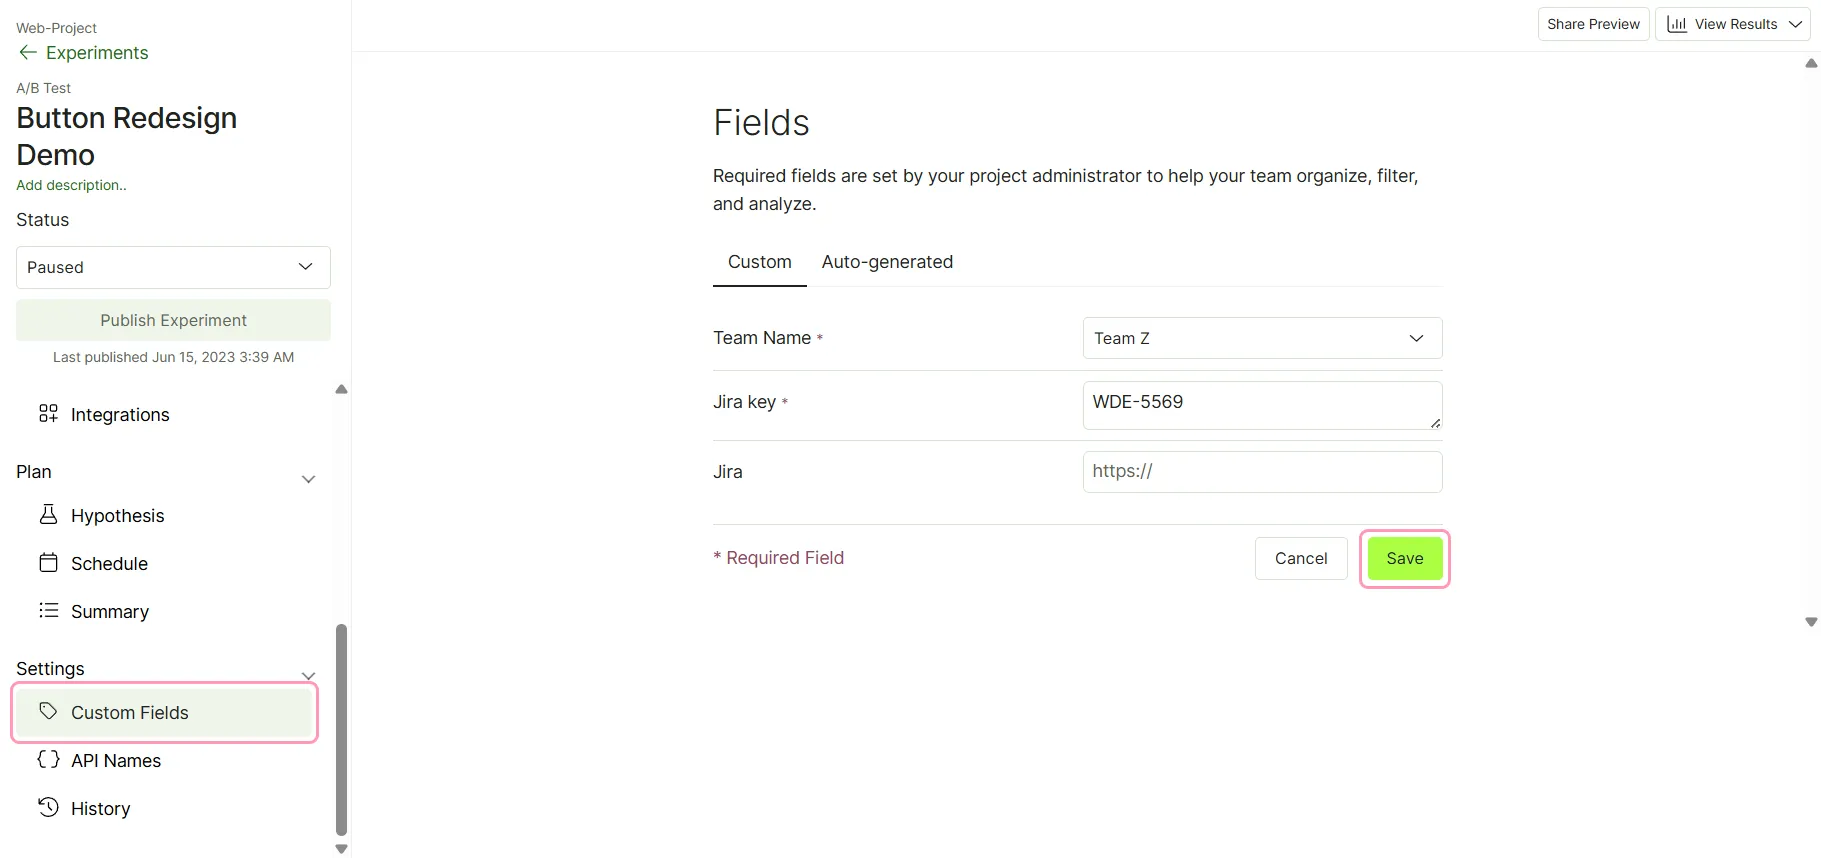
To view the fields Optimizely generates automatically, click the Auto-generated tab.