Media
Media in Optimizely Content Management System (CMS) (SaaS) are images, documents (such as PDF or Word documents), videos, or audio (such as mp3 files). Media files must be stored in the media library on the Media tab in the assets panel to be available in CMS. You can upload a media file to the assets panel and then drag and drop it onto a page or a block from the assets panel, or you can drag and drop the file straight from your computer onto a page or block. In this latter case, the file is automatically uploaded to the assets panel and stored in the For this Page or For this Block folder. See Folders for information on organizing your files in folders.
Note You can also manage media files from the Optimizely Digital Asset Management (DAM) asset picker. For information, see DAM assets.
Search for media
Use the search field at the panel's top to enter search criteria and retrieve media files. Clicking a search result expands the folder where the file exists. To access media files, click a folder to expand the folders and content beneath it.
Upload media
Upload media files through drag and drop from a file location on your computer to the upload area. You can also click directly in the upload area to add files. You can also select Upload Files in the context menu for the target folder to which you want to upload files.
Note You must have Create access rights to the global or application-specific folder under For All Applications or For This Application, where you want to upload a media file or the current page when uploading media files to the local For This Page folder.
CMS (SaaS) supports data files up to 500MB.
Upload media through Mark chat
Mark (Optimizely Agent Platform) is an agent orchestration platform that helps you work smarter in CMS (SaaS). Ask Mark to upload a file to the media library, so you can add an image to a page in the same conversation without switching to the assets panel. Attach the file in Mark chat or give Mark a public link to it.
Before you start, confirm that Mark chat is available to you and that you have Create access rights to the target folder. See Mark chat for Optimizely CMS (SaaS).
To upload media with Mark:
- Click Ask Mark to open Mark chat.
- Attach the file or paste a public link to it.
- Ask Mark to upload the file. Include the file name with its extension and any property values the media type requires. For example, Upload this image as team-photo.jpg with the alt text Team members planning at a whiteboard.
- Review the response. Mark confirms the upload and states whether it published the file.
Keep the following in mind when you upload media with Mark:
- Media type – Mark selects the media type that supports the file extension, such as Image for a .png file. Administrators set the supported extensions on each media type.
- Required properties – Include a value for each property your media type requires, including properties your administrator added. If a required value is missing, Mark names the property and does not upload the file. Alt text is the exception.
- Alt text – If the media type requires alt text and you do not provide it, Mark uses the display name instead. Without a display name, Mark uses the file name. Write descriptive alt text, because a file name rarely describes an image for screen reader users. Review or change the alt text later in Edit media metadata.
- Folder – Mark stores the file in the For All Applications folder.
- Publishing – Mark publishes the file after it uploads. If Mark cannot publish it, the file stays unpublished in the media library. See Publish media.
- File location – The link must be a public http or https address. Mark cannot download files from internal or private network addresses.
For the parameters Mark uses to upload media, see System tools for Content Management System (SaaS).
Publish media
If you did not set up your system to automatically publish media files when you upload them, you must manually publish or schedule for later publishing media files, just as with other items.
Warning Publishing media files
- If you want to automatically publish media files upon upload, you must have Publish access rights for the folder where you upload the files. See Access rights.
- Search engines may immediately index a media file when it is automatically published, letting it appear in search results. Keep this in mind when uploading sensitive information that should remain inaccessible until a specific time, like an annual report.
- If you set a content approval sequence on your media folder, media files are not published automatically.
Insert media
You can add links to uploaded media files or insert images and embedded media such as videos. See also: Add links and Add and edit images.
Preview media
Thumbnail images represent media files in list views. Common image file formats are rendered for preview by default in Optimizely, but you can develop other rendering formats.
Download media
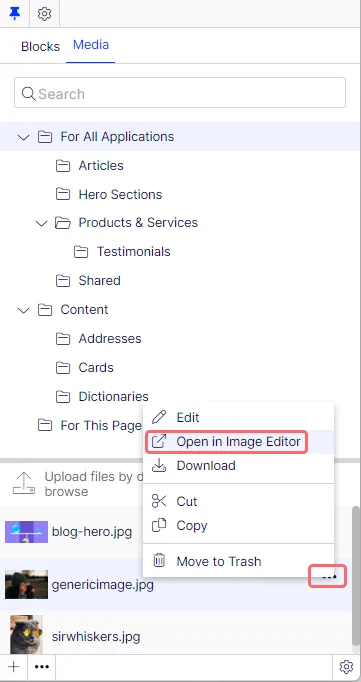
Select the desired media file in the Media structure and select More (...) > Download.
Or, if you are previewing the media file, select Options > Download this file.
Edit media metadata
Available metadata fields depend on the implementation; images can have photographer, description, and copyright information. Select More (...) > Edit for the desired media file in the Media structure, and then the All Properties editing view to edit the metadata properties.
Rename media
Select the media file in the Media structure, then the All Properties view, and change the Name and the Name in URL.
Note Renaming a folder or media file changes its URL but does not break internal links on the application. However, incoming links from external applications may break.
Replace media
To replace an existing media file with another, upload a file with the same name to the same folder as the file you want to replace. A replaced media file is published immediately, affecting places on the application that use the file.
If you change the name property, the file name in the database is also changed. If you rename an image, for example, from Button1.png to Button1, and you later want to overwrite this image, you have to upload an image with the name Button1 without the file extension. Otherwise, it uploads as a new file.

Due to application caching, the changes may not be immediately visible when replacing images. Refresh the page to see the changes.
Manage media file versions
Versions for media files are managed like for other types of content, that is, by using the Versions gadget. See Publish versions of content.