Configure Payment Service
Payment Service lets you add secure payment gateway providers to your ecommerce site. Payment Service uses the Spreedly payment orchestration platform to provide security, flexibility, and stability:
- Use a payment platform without implementing custom code.
- Access more payment gateway options.
- Implement multiple payment services on a single website.
Note
Optimizely Configured Commerce limits each site to one gateway, although Payment Service supports multiple gateways for a single site. To change this limit, work with your partner.
Before you begin
Before you enable Payment Service for Optimizely Configured Commerce or Optimizely Commerce Connect, review the list of Spreedly-supported gateways.
After you select a gateway, note the following:
- If an enterprise resource planning (ERP) or third-party system needs payment tokens, the gateway must support the Store operation. For example, an ERP system uses payment tokens to capture a payment after delivery. Find the Store operation in the Supported operations section of the gateway fact sheet. See the Stripe Payment Intents fact sheet as an example.
- If the gateway requires 3-D Secure 2 (3DS2), the fact sheet displays Yes for Spreedly 3DS2 Global Supported. Configure 3DS2 in Payment Service when you add a merchant profile and a Strong Customer Authentication (SCA) provider.
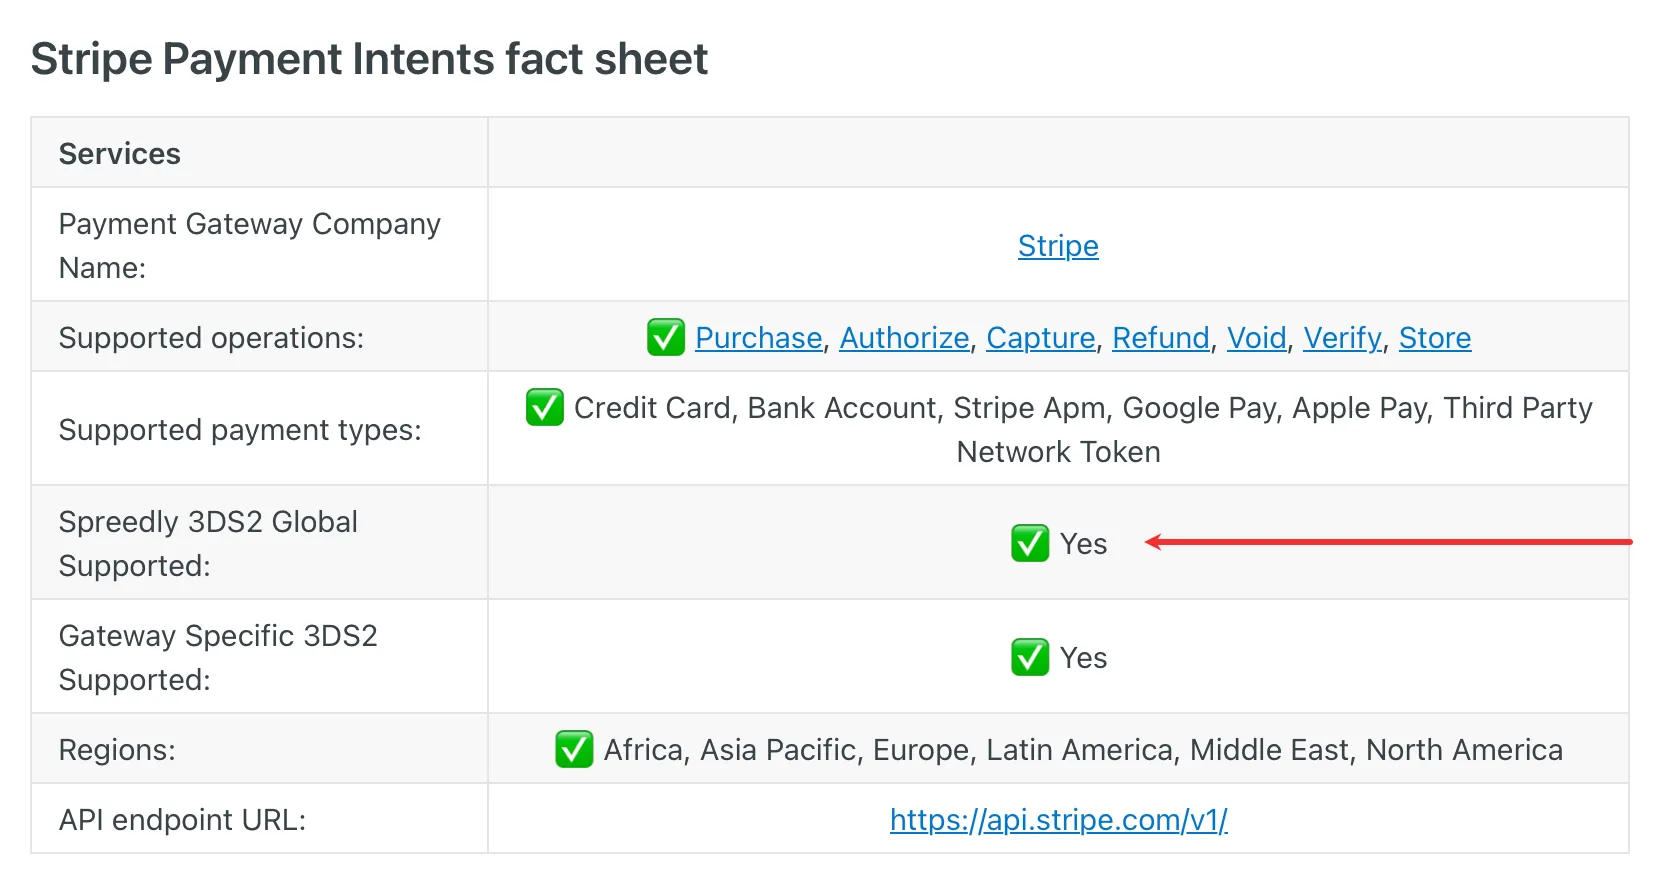
Gateway Specific 3DS2 Supported on the fact sheet refers to native 3DS2 support from the gateway. Payment Service does not support native gateway 3DS2.
- Each payment gateway requires a different implementation in Spreedly and Payment Service. The Spreedly gateway guide lists the steps to turn gateway features on or off. Complete these steps in the gateway payment portal, or contact the gateway provider support team.
- Some gateways have gateway_specific_fields, which pass custom information from Optimizely and Payment Service to the payment gateway provider. Customize these fields yourself or with your partner. For example, send order information from the payment gateway to the ERP system.
If Spreedly does not support your gateway, contact Optimizely Support.
Enable Payment Service
Configured Commerce
Prerequisites
- Run Configured Commerce version 5.2.2608.722+lts or later.
- Run your site on Spire. If your site runs on Classic, migrate to Spire to use Payment Service.
- Turn on OptiID for Admin Console sign-in. See Enable Opti ID.
When you meet the prerequisites, contact Optimizely Support. Optimizely Support adds the keys for a Payment Service instance to your commerce environment.
After Optimizely Support adds the keys, restart the site. Then continue the configuration on the Payment Service admin pages.
Commerce Connect
Prerequisites
- Run Commerce Connect version 14.46.3 or later.
- Install the Optimizely.PaymentService.Client NuGet package.
When you meet the prerequisites, contact Optimizely Support to request a Payment Service instance. Optimizely provides the PaymentServiceUrl, AppKey, and SecretKey values for the following configuration.
Add the following block to the appsettings.json file in Commerce Connect. Use the values from Optimizely Support. Set EnvironmentName to the customer name and environment type, for example, acme - test:
"PaymentServiceOptions": {
    "PaymentServiceIsEnabled": true,
    "PaymentServiceUrl": "PAYMENT_SERVICE_URL",
    "AppKey": "APP_KEY",
    "SecretKey": "SECRET_KEY",
    "AuthenticationType": "HMAC",
    "EnvironmentKey":, //leave blank; Payment Service provisions this value
    "SigningSecret":, //leave blank; Payment Service provisions this value
    "EnvironmentName": "ENVIRONMENT_NAME" //(example: acme - test)
}
After you add the keys, restart the site. The site establishes the environment automatically at startup. Then continue the configuration on the Payment Service admin pages.
Add gateways
Complete the following steps to add a payment gateway to Payment Service.
- Go to Administration > Payment Service in Configured Commerce or Commerce Administration > Settings > Payment Service in Commerce Connect.
- Click Add Gateway.
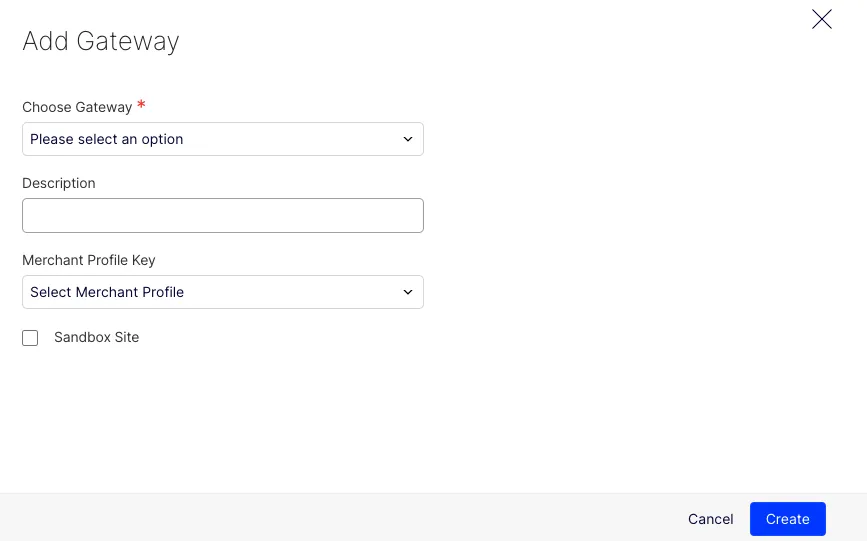
- Select the gateway from the drop-down list. The form populates additional fields depending on the gateway.
- (Optional) Enter a Description.
- (Optional) Select your Merchant Profile Key if you have already created a merchant profile.
- Select whether to use this gateway in your Sandbox Site.
- Fill in any additional information for your gateway.
- Click Create.
Enable 3DS authentication
To enable 3DS authentication, create a merchant profile and an SCA provider. The merchant profile holds the SCA provider. The SCA provider runs 3DS2 Global authentications on the authenticate endpoint or during authorize and purchase transactions.
Note
Configured Commerce does not support 3DS authorization or sales transactions through the Admin Console.
Add a merchant profile
Information for the merchant profile fields comes from your payment provider.
- Go to Administration > Payment Service > Merchant Profiles in Configured Commerce or Commerce Administration > Settings > Payment Service > Merchant Profiles in Commerce Connect.
- Click Add Merchant Profile.
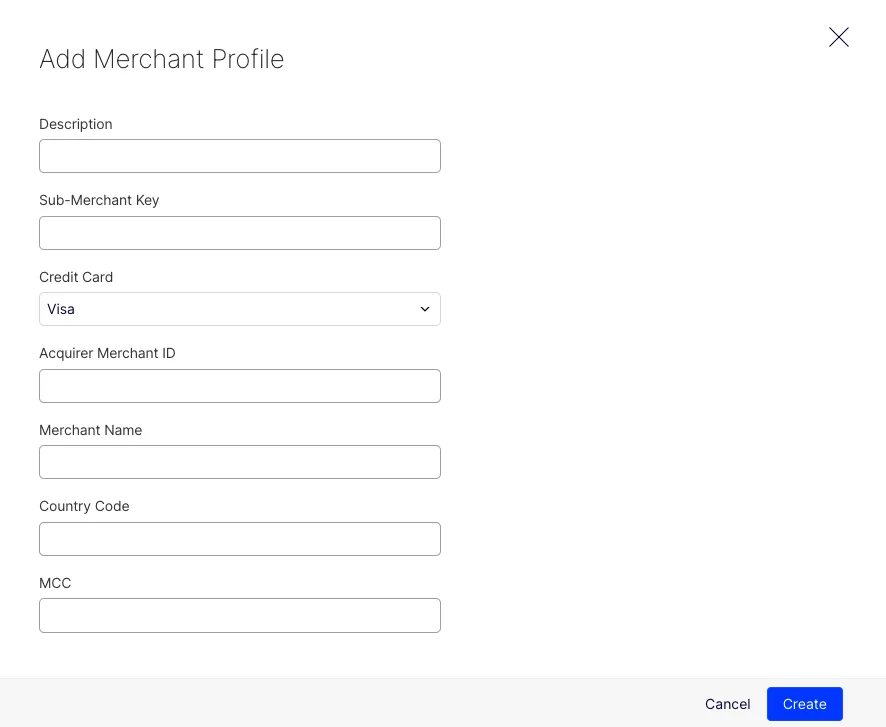
- (Optional) Enter a Description.
- Enter a Sub-Merchant Key.
- Select a credit card from the drop-down list.
- Enter the Acquirer Merchant ID.
- Enter the Merchant Name.
- Enter a Country Code.
- Enter the MCC. The merchant category code (MCC) classifies the type of goods or services that the business sells. See Spreedly 3DS2 Global.
- Repeat steps 5–9 for each card type your site supports.
- Click Create.
Add an SCA provider
You must create a merchant profile first to add an SCA provider.
- Go to Administration > Payment Service > SCA Providers in Configured Commerce or Commerce Administration > Settings > Payment Service > SCA Providers in Commerce Connect.
- Click Add SCA Provider.
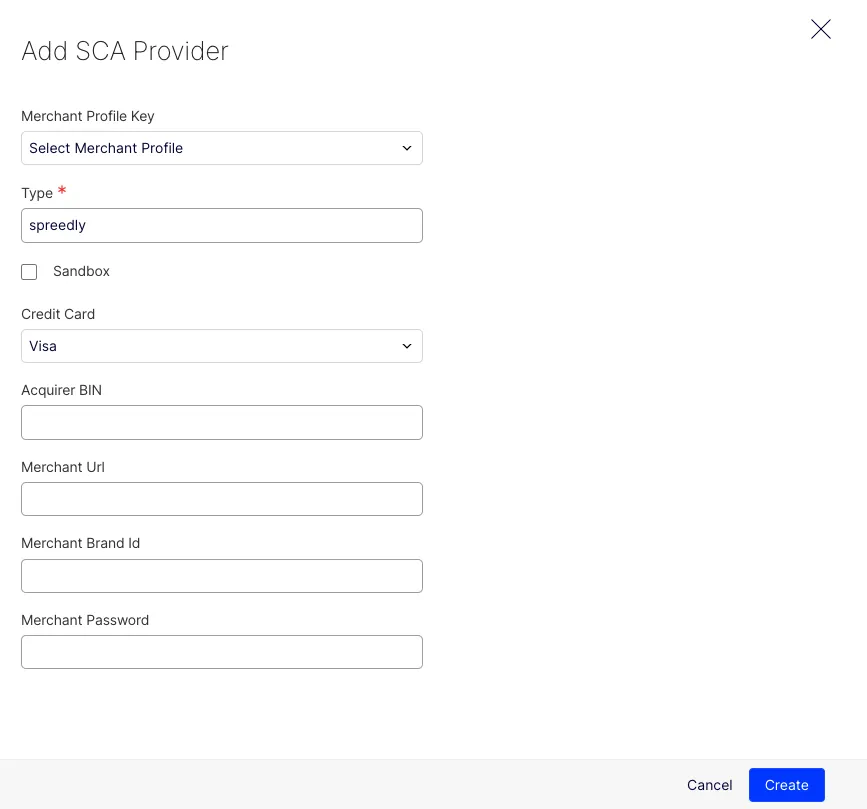
- Select a Merchant Profile.
- Enter the Type.
- Select whether to use this SCA provider in your sandbox.
- Select a Credit Card from the drop-down list.
- Enter the Acquirer BIN.
- Enter the Merchant Url.
- Enter the Merchant Brand Id.
- Enter the Merchant Password.
- Repeat steps 6–10 for each card type your site supports.
- Click Create.
Important
After you create the SCA provider, Payment Service displays the SCA Provider Key one time only. Copy and store the key. If you lose the key, create another SCA provider.
Test 3DS integration
Test your 3DS integration before you go to production. See Testing your 3DS2 Global Integration in the Spreedly documentation.
Enter Payment Service credentials in settings
Configured Commerce
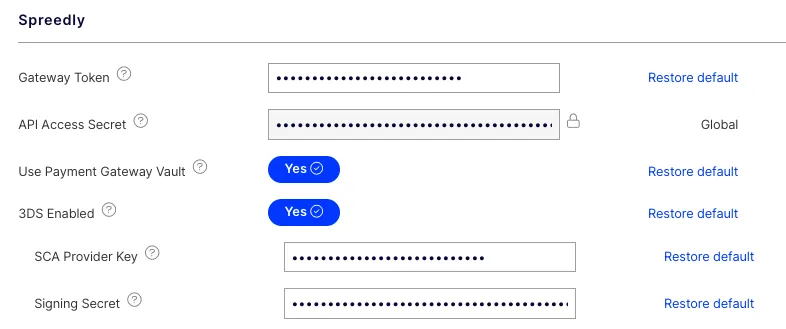
When you have completed the previous steps, go to Administration > Settings > Spreedly and enter the following information:
- Enter the gateway token from Add gateways for all websites or for a specific website.
- Toggle on 3DS Enabled.
- Enter the SCA Provider Key and Signing Secret from Add an SCA provider.
The website-specific Payment Service Request/Response Logging setting is in Administration > Settings > Order Management > Payment. When you turn on this setting, the system logs request and response payloads exchanged with Payment Service. The system masks sensitive data. Logging failures do not affect payment processing.
Commerce Connect
When you have completed the previous steps, go to Commerce Administration > Settings > Payments, click Create, and enter the following information:
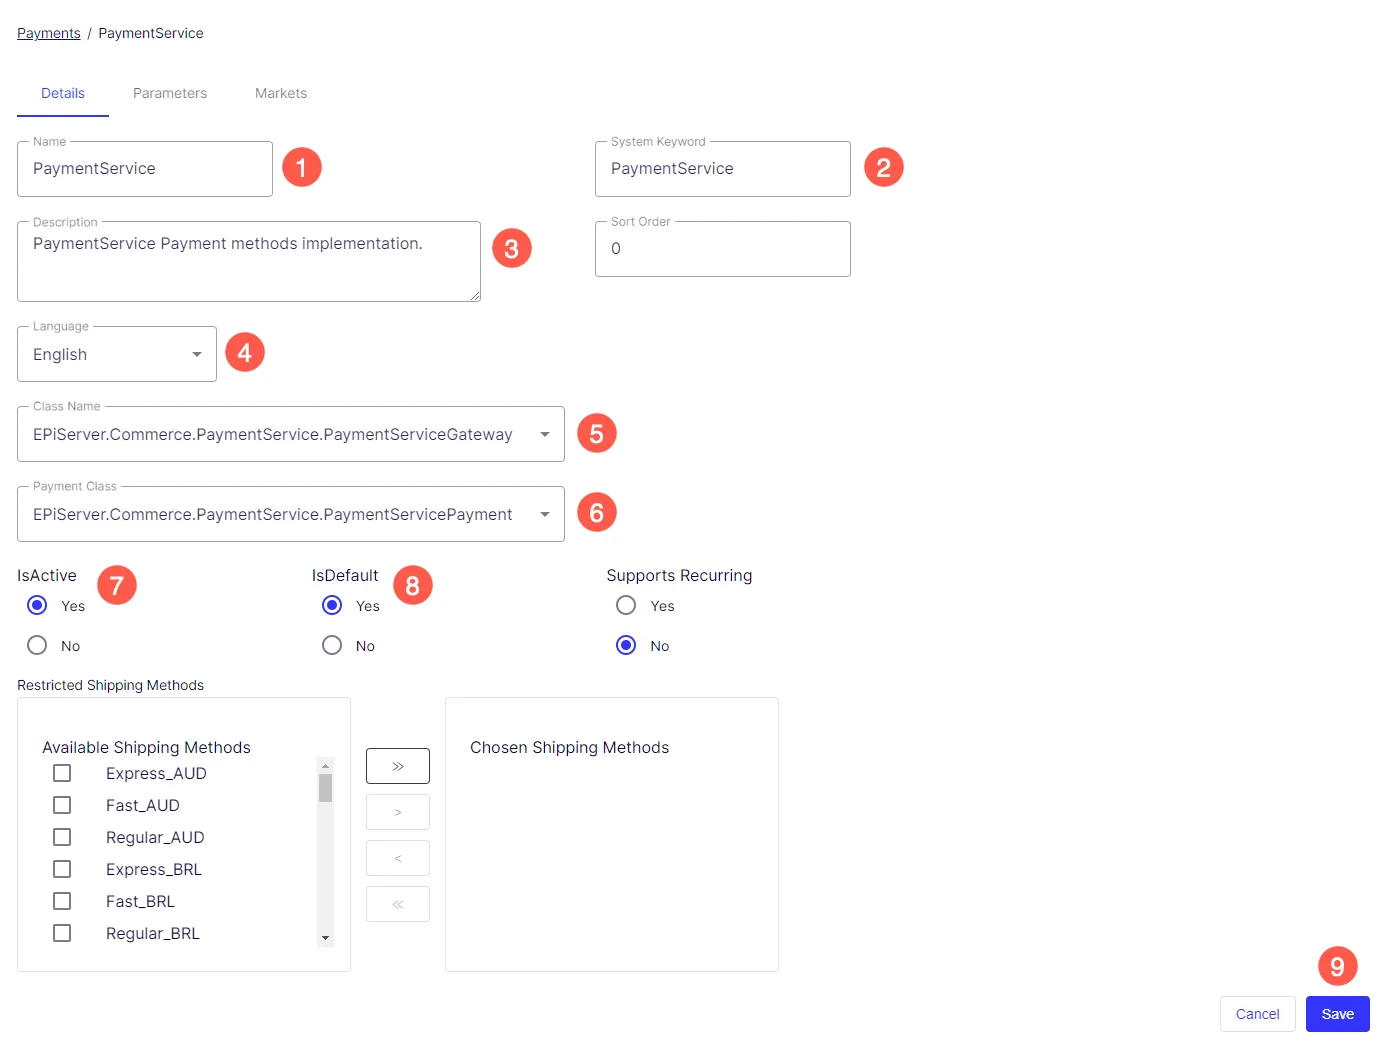
- Enter the Name.
- Enter the System Keyword.
- Enter the Description.
- Select a Language.
- Select a Class Name.
- Select a Payment Class.
- Select whether to use this payment in IsActive.
- Select whether to use this payment in IsDefault.
- Click Save.
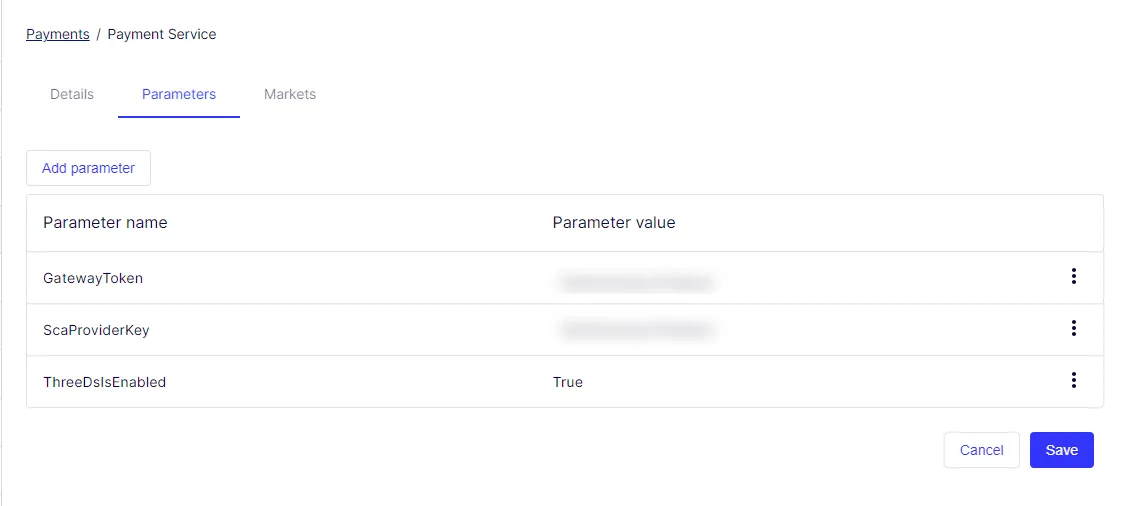
Select the payment method you created and go to the Parameters tab. Click Add parameter.
- Enter GatewayToken as the parameter name.
- Enter the gateway token you created as the parameter value.
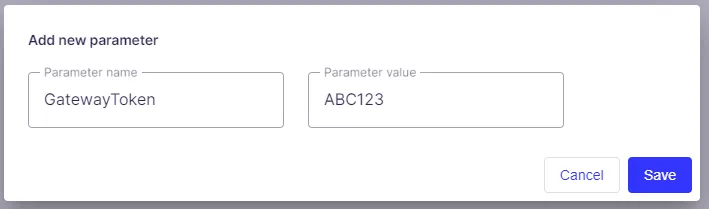
- Click Save.
Go to the payment method you created. Go to Markets and select the active markets. Click Save if you made changes.
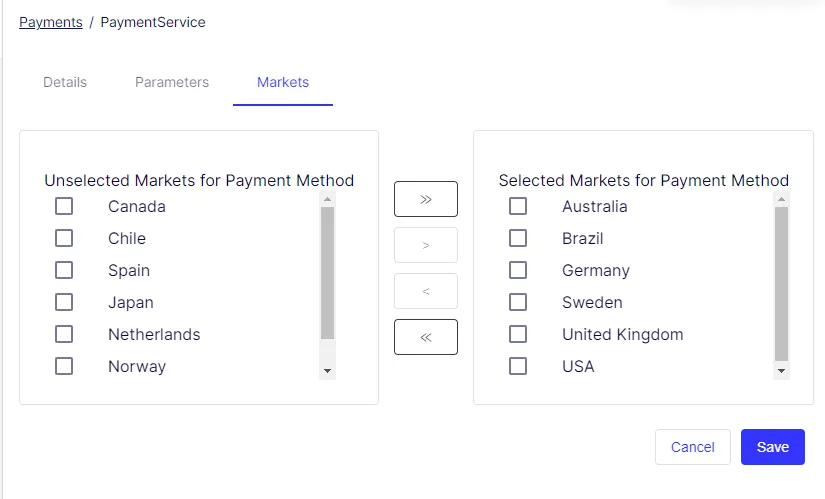
To use 3DS, create two parameters with the following names and values:
- ThreeDsIsEnabled – True
- ScaProviderKey – The SCA provider key you created
Click Save.
Note
Create other payment methods and sort them by IsActive, IsDefault, and then Ordering values.
Implement the Verify transaction type (optional)
Payment Service supports the Verify transaction type, which validates a payment method without placing a charge. Use Verify for scenarios such as saving a card on file or validating a payment method before a subscription begins.
Spreedly supports Verify transactions. Verify requires custom development through extensions. Override the appropriate payment processing handler to call the Verify endpoint instead of Authorize. See Verifying a card in the Spreedly documentation.
Verify transactions do not support 3D Secure.
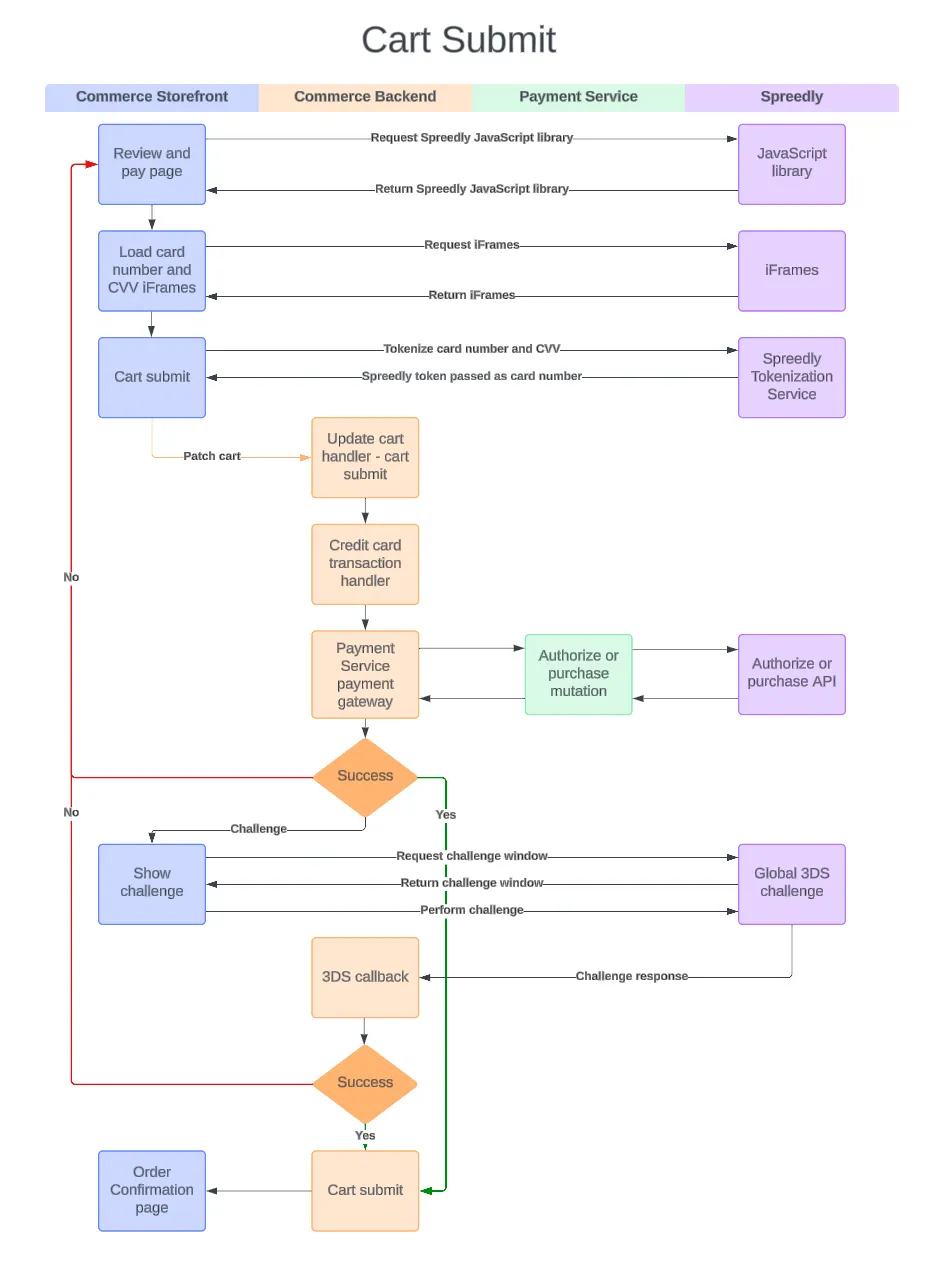
Payment Service cart submission flow
The following flowchart shows the Payment Service process during cart submission.
AVS and CVV gateway provisioning
Some Spreedly-supported payment gateways let you configure Address Verification System (AVS) and Card Verification Value (CVV) behavior. Configure this behavior through the gateway APIs or merchant portal. See AVS and CVV gateway provisioning for Spreedly.